Showing posts with label E-Design. Show all posts

June 14, 2013

Preteen/Teen Loft Space Makeover!

To me it is always fun to work in a multi-functional space.  When I was contacted by a recent client, she asked me if I could help trouble shoot her loft area and turn it into something special.  Suzanne's son is at the age of Lego's and drawing and having a space that fits his needs.  When I saw the space I was going to be designing for, I knew almost immediately that it would be a great transitional space for her son to enjoy through his teen years. 

This is the design I put together for their loft area...


For the space itself, the clients were wanting to keep the wall color as it was, so my job was to work around that and bring in some fun things that would allow the wall color to be fun but not overbearing.  By bringing in  a lot of white furniture pieces, it will lighten the room up immediately.  

My favorite find for the room is these Amazing game controller wall decals...


I came across these while looking for some fun additions to my son's bedroom and I thought that they would fit their son's loft space perfectly!

Another item that I thought was fun and funky was this throw rug...
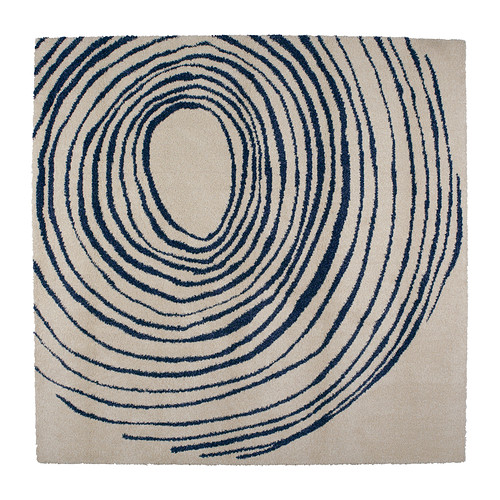
EIVOR CIRKEL Rug, high pile IKEA The dense, thick pile dampens sound and provides a soft surface to walk on.

A fun piece to ground the space!

This loft area was very cut up and had some unique, to say the least, angled walls.  So I put together a Room Layout as part of Suzanne's Design Package.


I created three different zones that will allow for playing, crafting, and gaming.


In the furniture placement, I created a visual for the client of where to put everything.  The detailed description of where everything goes along with all the hints and tips comes in the Source List that I send the client.  

So now when I speak about furniture placement in zone 1 on the source list, Suzanne can just refer back to the Room Layout to get the visual.

Speaking of zone 1, here it is.  The red sofa is getting sold so that will no longer be in the space.  

 Then all we need to do is Scooch the tv down, add a larger media unit underneath the television and put the controller decals on either side of the wall to finish it off.  Throw in two over sized Navy Bean Bag cushions and it's a place where their son can have a blast!  
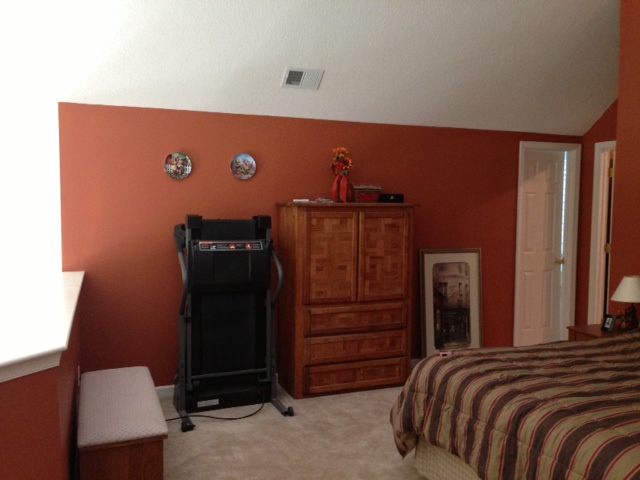
 This area is zone 3.  All of this furniture will be put back in to the spare bedroom to allow for a desk and two units, one on either side of the desk.   The desk itself is being repainted black and the units are something the client owns.  The black units are similar to these...

Threshold™ Carson 2-Shelf Bookcase

  I want this area to be a spot to do homework and craft, so I added in wall storage like these...

These will go above each unit to store all of his craft supplies and instead of ribbon, I suggested using brown wrapping paper so that he can pull it off the roll and create things with it.

In the middle of the wall units to go over the desk, I suggested a framed out chalkboard, so that he can either draw or keep notes and memos as he gets older.

To left on the lower wall here...
I suggested using two clip rails to display all of his artwork like the image below...


 This area is zone 2.  Again all of this furniture will be placed back in the bedroom off to the left there.  So we are working with a blank slate.  

In this area, I suggested we put the fun rug, along with a large white table to play on, and 6 of these black chairs so that all his buddies can hang out...
JULES Visitor chair IKEA The chairs are stackable and save space when not in use.

Along the back wall where you see the picture frame, I suggested that they add floating shelves to display some of the Lego's that my client's son likes to create.  He is like my son and likes to build them and look at them.  I was the total opposite as a kid, I built something, looked at it for a bit, smashed it, and tried to build something even bigger.  None of this put it together and be done, lol. 

 Under neath the floating shelves, I went with the Ikea Expedit Shelving to add storage and counter space for lamps and other toys...
EXPEDIT Shelving unit on casters IKEA
One in the 8 and squares and an additional one in the four squares to extend down the wall.  I also recommended using straight legs that Ikea offers instead of going the route of stubbing your toes on the casters.  I am a clumsy girl, so I know that I would go flying over these!  Just sayin!

Finally, off to the right on the angled wall, I suggested using the Ribba Picture Ledges from Ikea.

RIBBA Picture ledge IKEA The picture ledge makes it easy to vary your favorite motifs as often as you like.
To create a library area to display books and underneath I suggested a large sea grass style basket to keep all the extra books. 

And here's one more look at the overall Mood Board for the space...


I hope you liked seeing the space and the Design Board Package for it.

If you are interested in having a Design Board Package created for a space/spaces in your home, please contact me at seasideinteriors01@gmail.com or visit my website at www.seasideinteriorsllc.com.




May 22, 2013

Zen/Spa Retreat Living and Dining Room Mood Board 2 Ways!


Let me start out today by wishing my ridiculously GREAT husband a VERY Happy Birthday!!!  Happy Birthday Dust!  I have to give a big shout out to him for several reasons:
1. Because WELL, he's Awesome!

2. Because he always works hard to help everyone else.  For example, he will be up on a scafolding helping his client and then over to my parents to install a new fan for them.  All while he could have taken the day off. 

We are lucky to have him and just want him to know how much he is loved!  
We have some fun dinner plans so he at least gets the night off ;-)

Now onto worky stuff...

Yesterday I shared the wall color and lighting options for my clients that are hoping to have a Zen or Spa like Retreat.  Click HERE to see those options.  When I met with them for a consultation appointment yesterday, I was also able to share the Design Boards that I created for their Zen/Spa Retreat Living and Dining area.

For the dining room, I chose a softer Spa Like Pallet and for the Living Room I went with more of a Zen like space with some apple green touches.  That way the clients could choose which way they wanted the mood of the room to go and then I could just alter either design board.

The first one is my FAVORITE of the two, but I'll share both.

Here is the  Zen Spa Dining Retreat...
 I was really nervous to share the designs since I knew my clients where so hopeful to have a place not only that they like, but somewhere to escape to after a long day of work, and I wanted to get it right for their tastes.


I really like the freshness that this Design Board brings. The apple green is Yum Yum! With the the fun hanging lanterns in three sizes to the tree branch wall decal, it gives a cooler vibe.

So, which design board did they choose for the color?

DRUMROLL PLEASE........


They chose the muted tones of the Spa like Dining Room.  We may still bring in touches of green, but the overall space will have the feel of the Dining Room Design Board.

I was really hoping to bring in the tree branch decal on the right wall in the dining room and they liked it so much that I got the go ahead.  For the Spa Dining Room Design Board, my client said it was just what she wanted.  She really liked the metal wall structure that holds little tea lights that will go above her buffet and the glass orb pendants where her favorite.  SCORE!!!

Now on to doing a little change around for the living room furniture and then on to ordering some of these cool pieces.

I still have two other areas for their foyer area and sitting room that are in need of new matching light fixtures and a drop down pendant for over the kitchen bistro table.  I will share the final choices in those this next week.

Have a great Wednesday!  


Click HERE

Linking to:


March 12, 2013

Sophia's Big Girl Spring Inspired Bedroom Makeover

Today I wanted to share an Online Design Board that might just get you in to the spirit of Spring!!!

I was contacted by a lovely lady who was looking to have her daughter's room transformed from the toddler stage to a beautiful Big Girl Bedroom!  On the list of wants for the room, she said that her daughter really loves nature, but she wanted to bring that in to the design in a girly way.  I was pretty much starting with a fresh palette except for one dresser in the room that will become a DIY project.

So here is what I came up with for Sophia... 

 
The starting point for me was a pillow I came across on Etsy and just fell in love with it!  I decided to keep the walls white and have the color come in with all of the furniture and accent pieces.  The dresser that is currently in Sophia's bedroom is similar in shape to the one in my design board so a little DIY paint project with new hardware and it will feel like a whole new piece of furniture.  I really like how it all came together with the touches of birds and owls and Spring time, but still giving her the girly space to grow in to.
 
I hope you like the fun Design Boards that I have had the opportunity to share.  I am having a blast creating them.  Last week I received a request all the way from AUSTRALIA to create a soft palette Nautical Nursery Design Board for a soon to be baby boy.  Ahhh Australia!!  I am so excited!  The room is just about complete and should be posted this week. 
 
Source List For Sophia's Bedroom
 Jenny Lind Style Twin Bed Frame
 Birdy Wall Art
Pink floral Pillow
 
Pottery Barn kids Owl Bookends
 
Pottery Barn kids Clock
 
Pottery Barn Teen Quilt
White Umbra Wall Flowers
Spello Arabesque Rug
 
 Dresser Inspiration
 
Aqua Frames


If you enjoyed this post and don't want to miss out ;-) click up top there on the right and follow along ;-)


For information on my on-line design services, please click here.


For on-site design services {Greater Hampton Roads and Richmond Virginia}, please email seasideinteriors01@gmail.com for pricing and availability.


  If you would like to order an Online Design Package for a room in your home for the sale price please email me at seasideinteriors01@gmail.com.
 
 
Seaside Interiors


Linking To:
 

October 02, 2012

Relaxing Earth Tones Living Room Design Board

I can honestly say, I adore my job!  Number one, to be able to help someone transform a space in their home that allows them to really have a unique place all their own, is so much fun!  Another reason I love it, is that I get to express my creative side, which is constantly screaming at me to do something ;-)  So it is a win win for me!

This week I am working with a new client that loves reds and blues and wants to tastefully incorporate that into a sort of French Country Cottage feel.  So, I am working on that as I also finish up a design board that is inspired by Earth Tones that I want to show you.

Today's online design board that I am sharing with you is for a wonderful couple with two young children.  They have a living/family room that they are working on transforming into a more formal feeling space.  The existing space is done in greens and browns and the clients want to keep the existing color scheme.   Since the walls already have all the color the room needs, I wanted to keep the palette very light and airy and bring in a little of the wall colors to help soften the space.   I decided to bring in a more neutral beige shade and also a deep blue to add some depth of color.  One handy dandy tip is that if your walls are full of color, then always bring in lighter furniture decor and visa versa, if your walls are light, then add a punch of color with darker furniture.  It is always a nice contrast!

Here is the design board that I created...


Source List

Home Decorators Collection Panorama White Rectangle Sofa Table


THANKS for stopping by and feel free to leave a comment if you have any questions!


If you are looking for a design board to get you started on your home, please send me an email to seasideinteriors01@gmail.com.


September 26, 2012

More fun with Project Decor!

I had a lot of fun yesterday working on a board for Project Decor!  I came across an inspirational photo online this morning, so I decided to use it to create a fun mix of color in a bedroom atmosphere! 
 
Here is my mix of turquoise, red, and gray...
 
 
I hope you enjoy seeing these design boards as much as I enjoy creating them :)
 
I am currently working on two fun design boards this week for some new clients.  Hopefully I will be able to have the first one ready to share by Friday!
 
If you would like an inspirational room board created for a room in your home you can contact me at seasideinteriors01@gmail.com or hop on over to my website Here for pricing and examples of previous room boards. 

July 13, 2012

Living Room Inspiration Board!

Hope your week went well, mine was busy but a lot of fun..  I wanted to share with you a design  board that I created for a new clients' living room.  The design for this one was a Simple and Relaxing contemporary living room utilizing their existing couch and adding a lot of new accent furniture and decor in blues and greens.  The blues and greens are right up my alley since those are the colors that I have been decorating with in my own home over the last several months. 

Here is my idea of a relaxed style living room...


Today I got started on purchasing some of the room decor and furniture.  I found one of the two side tables, although mine is just a bit different, so I will spray the metal frame black on the one I found.  I just have to search for its twin.   I also ordered the upholstered chairs and beautiful accent pillows for the couch.  So, I feel like I got quite a bit accomplished today, YAY!  

I also have several DIY's to do on this room!   

There are pillow covers to make for the clients' existing couch cushions to go along with their new cushion covers I purchased today, a piece of artwork that I need to paint, and the verdict is still out on whether or not I will be making the curtains or purchasing them.  I wanted to at least  have 95" height on them and so far, I have searched and all I can find is the 84" in this specific color.  I will keep you posted on the details!   

I am now heading to bed since my kids have had three days of having friends sleep over and I am slightly exhausted ;-)   I hope you guys have some fun and relaxing things planned for your weekend, we are headed to a pool party tomorrow and a birthday party Sunday and I'm even gonna try to sneak in some bowling with my sister and my hubs.  Take care for now!

June 19, 2012

Traditional Contemporay Master Bedroom

I hope you guys had a great Tuesday!  I had an awesome day, lots of fun at our local theme park with the kiddos and one of my great friend!  We only got through three rides before we were wiped out.  Apparently, we are not ready for the summer heat ;) 

I also had the opportunity to send my first OFFICIAL mood board to my Very First Client!  Ahhh!!!
I was excited and nervous all in the same.  I just hoped the client liked it as much as I did.  I only had to wait a few hours for her email to find out that she loved it.  Yay!!!  She really liked the color combo I had created and the blend of traditional and contemporary furniture pieces that I put into the design.   It looks like she might want me to decorate the room too, fingers crossed!

The client didn't mind me sharing the board with you, so here is my idea of a traditional contemporary Master Bedroom...


Hope you guys like it :) 

May 16, 2012

A New Path

I hope you are all having a great week!  Today, my post is a bit different than previous ones.
Most of my blogging thus far has been about the projects going on around our house and the inspiration I have found from other bloggers and decorators/designers on the web. 

 I wanted to open up a bit more and share a few things about myself and what I am currently up to. 

As of last April, I received my teaching license to teach elementary school k-6.  Since receiving my license, I have been working as a substitute teacher in the school district in our area.  I have gained a lot of experience working with the students in all elementary grade levels, but so far, the teaching jobs in our area continue to be far and few between.  I haven't given up hope on a teaching job, but I am also looking down other avenues. 

Throughout this past two years, while I was working towards becoming a teacher, I have also been heading down a different path without even knowing it :-)  
To me this couldn't come at a better time! 

The other path I have decided to take is
Interior Decorating

 I don't know where it started, but I know that I have always loved the ability to express myself in various artistic forms and interior decorating seems to come natural to me!! 

Let me take ya back...

Eight years ago, I started a cake design business with my mother in law.  We started from scratch, but moved quickly from the regular bakery style sheet cakes in to some amazing works of art for our clients.  I worked with my mother in law to design the cakes and from there I was able to bring the cakes to life!  Many of our high end cakes that I was fortunate enough to create, where published in Wedding Cakes, A Design Source Magazine.  It was something I never imagined would happen and to this day, was one of my biggest accomplishments :)

Designing and decorating cakes gave me a lot of insight into decorating!  Over time I knew what colors worked well with others, how to give the right mood or feel to a cake, and working with my mother in law, we were able to bring a brides dream to reality!
My mother in law Elizabeth Williams is still running the cake business The Magic Cupboard.  You can check out the amazing site here.  

Here are some of the cakes I was able to make during my time at The Magic Cupboard.


Choc scroll cake

Chivas Regal


Black and White Classical cake


 Sponge Bob
Spongebob was one of the funnest cakes to make!!! 

Baby Diaper bag #2
This cake was by far my favorite baby shower cake! 


weber grill
 Anyone for a backyard BBQ?


The tiara and pillow cakes always seemed to be a big hit...

purple pillow cake


Princess pillow cake


Vera Bradley look alike
 My attempt at a Vera Bradley Knock off.

fireman helmet grooms cake
A surprise firefighter groom's cake for one of my husband's co workers. 


The last two cakes describe more of my current environment of the DIY world ;-)

 home depot


Home Improvement

Just taking this little cake walk ;-) down memory lane is bitter sweet!

It was a VERY difficult choice to step away from designing and decorating cakes, but my kiddos where still little and needed more of my time than the cakes would allow! 

So, where does that leave me?  Well, I have thought long and hard about it and I have come to the decision to start my own interior decorating business.  I know, CRAZY and EXCITING all in one!!!  Currently a little more Exciting than crazy.  I went back and forth over the name and finally chose Seaside Interiors, LLC

 I have a relaxed and cozy way of decorating, I love to decorate interiors that give the feel of a retreat in your home, and I live on the East Coast, so I think the name kinda sums it up ;-) 

I still have quite a few things to do which include:

Building a Website
Setting up my Office
Make my Brochures
Begin Marketing my Business
Adding an E-Design Option to my blog and/or website
Have a logo made

A few things on the list are already underway. 

First, I am currently working with Molly of Mixed Molly Designs


 to create my logo and business cards.  I saw Molly's work on Blue Roof Cabin when she created this logo for Mimi.   


 I emailed Molly immediately!  She has a great eye for designing logos and her pricing is very reasonable and much cheaper than many of the other graphic designers that I came across.

So over this next month, I will be able to share with you my choices of logo and the completed product.  I am soo excited to see the end result!!!

Another "to do" is to set up the E-Designs portion of my business on my blog and website.  Many of you already know about E-Designs, which are also known as Mood Boards or Design Boards.  I have been creating them for a few years now.  I started doing them for my own rooms when we began to build our house and then more recently I was asked by friends and family to create Mood Boards for their homes.  I love doing them and I hope by this next week I will be able to have it set up and available on my blog. 

Here is one of the recent Mood Boards I created...


Thanks for letting me share all that with you guys!  I would love to hear your feedback and I will keep you posted on the process of starting my business.