November 20, 2012

Yummy Soft Snickerdoodles!

 By this time each year, I am usually completely stressed and worn out from hustle and bustle of what comes along with the holidays.  BUT this year, not so much!  Maybe because my mum is doing Thanksgiving and I am taking care of Christmas dinner.  We usually switch off so one of us isn't doing everything.  And I have never gotten into watching the Lifetime Christmas movies before, until this year. My daughter and I have already seen 5 of them ;-). Usually I just watch my regular fav's like A Christmas Story, Grinch, and Grizwald's Christmas Vacation right before Christmas.  I think my main goal this year is to keep the holidays SIMPLE.  I am not going black Friday shopping for the first year either.  Who needs it when you can go Cyber Monday shopping in your pjs.  I just want to spend time with family and make some yummy food!  Which leads me to the first recipe for the Thanksgiving holiday...  

Soft Snickerdoodle Cookies


Recipe Source Here
  • Prep Time: 10 mins
  • Total Time: 20 mins
  • Servings: 24

Ingredients

    • 1 cup butter
    • 1 1/2 cups sugar
    • 2 large eggs
    • 2 3/4 cups flour
    • 2 teaspoons cream of tartar
    • 1 teaspoon baking soda
    • 1/4 teaspoon salt
    • 3 tablespoons sugar
    • 3 teaspoons cinnamon

Directions

          Preheat oven to 350°F.
  1. Mix butter, 1 1/2 cups sugar and eggs thoroughly in a large bowl.
  2. Combine flour, cream of tartar, baking soda and salt in a separate bowl.
  3. Blend dry ingredients into butter mixture.
  4. Chill dough, and chill an ungreased cookie sheet for about 10-15 minutes in the fridge.
  5. Meanwhile, mix 3 tablespoons sugar, and 3 teaspoons cinnamon in a small bowl.
  6. Scoop 1 inch globs of dough into the sugar/ cinnamon mixture.
  7. Coat by gently rolling balls of dough in the sugar mixture.
  8. Place on chilled ungreased cookie sheet, and bake 10 minutes.
  9. Remove from pan immediately.
 
The one thing I always suggest is to take the cookies out just before you think they are done!  They will cook just a bit more out of the oven.  That's how I always keep mine soft in the middle.  Also, I made mine a bit bigger than the 1 in. rd size that this recipe calls for.  More like 2 in. size for mine ;-)  So I did just about 11 min. on the baking.   Since I needed 30 cookies for my son's classroom party, I just went ahead and tripled the batch to leave some for us!
 
 
 Tomorrow is another baking day for me.  The list consists of Pumpkin Pies, Sweet Potato Pies, Blackberry Cobbler, and hopefully some of my husband's Great Grandma's Ginger Snaps.  Check back in for a few more great recipes and my very favorite easy to do pie crust recipe :)
 

November 16, 2012

Awesome Holiday Crafts for Cheap!

This year the budget for Christmas decorations is, well, almost a nice big Zero.   So I am going to do some of my own homemade crafts that I think will add some fun to our Holiday without really breaking the bank.  Let me show you what I have in mind...
 
Pinned Image
 
I love the option of creating a large holiday item that has an impact on your room but not on your wallet!  I am thinking of creating two of these maybe for by the fire place.  I already have some boxes, a scarf, the black card stock and possibly the orange card stock.  I may be able to take some wrapping paper and use the lighter side or if not, all I would need to pick up is some white paper.  And I will have some fun snowmen for really cheap. 
 
Pinned Image
 These are great too!  If you are a crafter like me, then you probably have a bunch of Popsicle sticks laying around.  If not, they are a very inexpensive item to pick up at the dollar store. 
 
What I really love about the last two crafts is that my kids can actually help make them.  So we can turn it into some family time!
 
 The idea to do some of my own Christmas Crafts came when I went to Target.  Ok, Ok, yes I went to Target AGAIN.  It's an addiction and we are having me checked out for it ;-) 
 
While I was there, I found all sorts of goodies that I thought hmm, "I can so make those at home for a fraction of the cost.". 

Here's what I found...
 
 
 A beautiful white nutcracker for $20.  Not bad at all, but since I have a few old nutcrackers already, and spare spray paint, I think I can do this for FREE! 
 
 
I love this branch Wreath for the Front Door.  Sort of Frosty and Silver.   
 
 
But with a price tag of $45, ouch!   For this project, I am going to need a little bag of glisteny (we are going with that word) snow, a bag of mini pine cones, some grayish silver spray paint, and some twigs and branches.  I think I can make this guy for pretty cheap! 
 
 
If I get the stuff to make the wreath above, I can easily make a few of these with the left over items.  Ok kids, OUT TO THE WOODS FOR SOME BRANCHES!  What, you know you would send your kids too, lol! 
 
I also can't get enough of these sweater cones!!!
 
 I know these are a definite on my to do list.  I think these can be made for cheap out of a Styrofoam cone or heavy card stock for the cone shape and some thrift store sweaters or old sweaters you may have lying around.  I don't know if the dollar store sells the Styrofoam cones, but I bet Walmart does or you can even get them for cheap with a coupon for Michael's or Joanne Fabric.  Another quick and easy project!
 
So if I were to purchase all of these items from Target, I would be up to about $140 bucks or so.  I hope to be able to create them for a very small cost and I will be back with up coming posts to show you how to do that. 

Don't worry, I haven't forgot about Thanksgiving, I will be chowing down on Turkey next week at my mum's, but I have my eye fixed on Christmas. 
 
 For example, I have been recording Lifetime Christmas movies and last night I put on one called Dear Santa.  It was so bad that my husband got up from the couch and cleaned the entire kitchen.  See, I have Christmas plans ;-)
 

November 14, 2012

Even MORE Target Inspiration & A Painting Update

Target you're killin' me!!!    I was only supposed to stop in at Target yesterday to get a few artist brushes for a paint job that my husband was doing, but I went to the holiday section and found so many cute pillows!   I thought I should share to help get you in the spirit ;-)
 
Starting with this guy!  I have always had a severe obsession with penguins.  So much in fact that as a teenager, for every birthday, I got some sort of penguin.  I still have not gotten over them, all though my owl obsession is starting to take over.
 
 
 I love him!  The colors are a different change to the deep red and green of the holidays.  His smile is so sweet!
 
 I am always a sucker for buttons on pillows.  This one has different textures from the material on the word Merry to the buttons and I like the muted colors in the word Christmas.
 
 
 A very modern feel to a snowflake pillow.  The stitching on the snowflakes adds a neat touch.
 
 
 Felt pillows have never looked so cool and contemporary!
 
 
I love the blues and grays in this one with a hint of green.  I tend to find that I am more drawn to the red and green of the holidays when they are separate from each other with a mix of new colors. 
 

Again, I was supposed to be ONLY looking for some small artist brushes for a paint job my husband was working on, but I couldn't help myself.  And hey, I should be patting myself on the back, do you know how many rows of Christmas home decor and decorations they have that I didn't stop to take pictures of.  I know, my husband should be thanking me for staying mostly on track, lol!
 
 
And here is a little look at the painting we are doing for the interior decorating job I am working on this week...
 
 
BEFORE


AFTER


 It was a little hard capturing the exact color with my cell phone, so I will take better ones today.   The color is Sherwin Williams Languid Blue.


November 09, 2012

Target Inspiration!!!


I stopped in at Target and found all the new fall decor.
 
Hello Mr. Berkus, so good to see you here!
 
 Ahh!!!
 
Let's move in closer...

These are gorgeous!  A great black and white ceramic vase with a chevron pattern.


Don't you think these are so neat?  I could see one placed on some books on a coffee table.


Nate's collections always have a lot of depth to them.  It's great how he brings in a lot of texture and pattern and how they work so well together. 

What is with me and owls?  I DON'T know.  But I can tell you I am not the only one.  I stopped in at TJMAXX and I saw owls everywhere and then came over to Target and fell in love with this guy!  Don't deny it, he's adorable!!! 


This pillow collection just feels so wintery and cozy too me.  Movie time on the couch with these pillows and a big textured blanket please.
 

I think these pillows say contemporary log cabin.  So very cute!


Again, a lot of muted colors that bring in pattern and texture. 
 
 
I am eyeing the turquoise and gray pillow top right. 


This one is very pretty too!
 
Thanks for stopping by :)
 

November 07, 2012

Halloween Decorating Recap Part 2

 
In the last post I shared the decorations we did for Halloween.  Today, I wanted to finish things up with the decorating we did for our Halloween party! 
 
How do you get ready for a party?  Well, we like to have a murder take place and who better to be the victim than my lovely sister ;-)


As we were taping around her, someone decided that having the head attached would be a bit boring so...
 
A decapitation and sawing off of the leg was in order!  I don't know if you can tell, but my husband loves Halloween ;-)
 
As the guests entered, we had the crime scene to their right and the photo scene to their left.
 
For the photo scene, I created a police line up backdrop.
 
I took an old white sheet, a can of black spray paint, some blue painters tape to tape off the lines, and a pack of cardboard number stencils and in about 30 minutes, I had a police line up!
 
Here is a couple of our guests, which by the looks on their faces were way to happy being arrested...


After you get past the line up and crime scene, you are free to roam about the house and get some grub.  For treats I created a Gruesome Dessert Table, but not too gory where people wouldn't eat the stuff.


Let's take a closer look...
 
 
Oozing Blood Cake
 
Severed Fingers
 
Bloody Fingerprint Cupcakes
 
I wish I could find my picture of my Oreo truffle eyeballs on the stands I created, but I must have put them on the table after I took the pictures :(   Oh well, here is what the stands looked like when I made them...
 
 
Quick and easy to do and very inexpensive!


Ready for the Eyeball Truffles 
 
 
If you would like to create your own stands, all you have to do is pick up a few inexpensive plates.  These were black plastic trays/plates that I found at target.  I was going to stick the usual glass candle stick in the middle, but then I thought it would be a bit more fun to create a little something more spooky.  So I took some dollar store moss and some sticky eyeballs from Target and I put them in a regular drinking glass.  I put a little hot glue around the rim of the glass and I attached the larger tray to the glass.  With the glass upside down and attached to the larger tray, I hot glued the smaller tray to the glass and created a two tiered stand. 


 There was also a lot of really cool lighting going on. 
 
From candle lit areas...
 
To Blue Light Specials...
 
 
 Out of all the areas that were decorated, the one place you didn't want to enter into was Dexter's Kill Room...
 
 
First, we covered our morning room in wall to wall plastic to give it the authentic Dexter feel, then we printed up large pictures of the Victim's, which were actually the guests at the party.  Finally, what every Dexter Kill room needs is Blood Spatter.  So we flung red paint all down the plastic and across the victim's pictures.  


Yuck right?  I know I love it too ;-)
 
 
 We even covered the ceiling.  Who wants to leave any DNA behind, right? 
 
 
 We decorated the beverage table with Red Rum Punch to give it the running blood feel.  I know, we are sick, lol!
 
 
We made 100 jello shooter syringes, because if you watch Dexter you know that this is how he takes his victims down, and well, if you don't watch Dexter, then these are just a really cool way to serve jello shots for Halloween.
 
Since we had a Dexter Kill Room and Dexter's Syringe, what else would you need to finish it off other than DEXTER HIMSELF!!!
 
 And to add to the effect, well you can't have Dexter without a victim!  And P.S. if you were thinking that my costume does not look comfortable, well, you would be right!!! 
 
 It's as simple as that!  Don't go into Dexter's Kill Room for a drink or you may end up injected with a jello shot! Which, now that I typed that sentence, doesn't sound too bad, lol.
 

November 05, 2012

Halloween Decorating Recap Part 1!

 
If you are anything like me, when a holiday is over, I am ready to move on to the next one!   Well, I don't really do fall decorations since we go all out on Halloween.  So, before I jump into Christmas ideas for decorating in the weeks to come, I thought I would share a recap of what we did for Halloween!!
 
 
Here is the left side of the built-ins.  The only thing missing from this picture is the dead flowers that I hadn't yet put in the green slimy water when I took this picture.  I waited closer to our Halloween party to put the flowers in.  To get the green sludge color,  I just dyed some water with a little yellow and brown food coloring. 


 Moss and eyeballs are a cheap and easy way to bring the "CREEPY" factor into your home.  I also found some Halloween portraits online to finish it off.


Guarding the TV
 
 
Our pretty lady!
 
The right side of the built-ins


 Up Close and Personal
 
 
 A little black netting across the family photos


A little bit of bathroom fear is always good, right?  Not pictured is a rat caught in a trap on the floor.  My friend did not use this restroom for at least two weeks when she would come to visit, which means I did my job, lol!
 
 
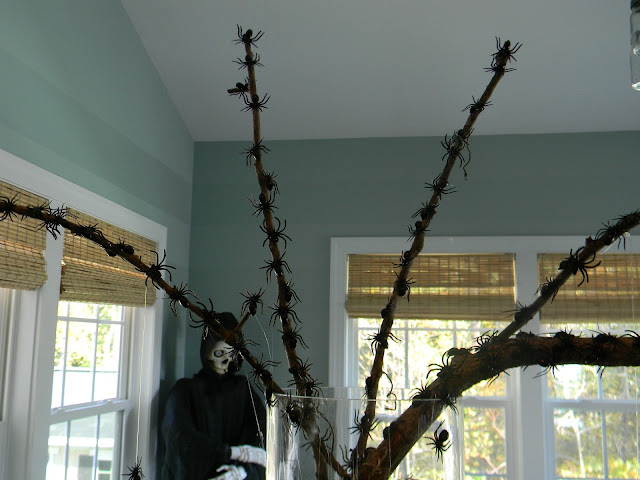
My Spider Tree


I purchased a bag of sticky eyeballs and a few bags of plastic spiders from Target and then stopped in at the dollar store for the moss.  My son went into the woods behind our house and got the large branches to stick in the vase. 
 
I really love it when decorations are cheap, but they still make a big impact!
 
 
If you look closely in this picture, you can see the clear jewelry cording I used to tie around the branches to hang the spiders.   Then I just went to town with my hot glue gun sticking the spiders to the branches!


This is my favorite lady we have around the house during Halloween!  I always have the eerie feeling that she is watching me.  I'm right aren't I?  She is watching me!!!
 
 
 And of course, no Halloween is complete with out a vampire welcoming you in.


Check back in for Part 2: The Halloween Party...