July 01, 2013

Modern Dining Room Design Plan

I'm back!  I've been missin in action off and on for a few weeks due to an overloaded schedule, but we are nearing completion on a couple jobs so I feel like I am able to carve out a little more time and get back to my regular blogging schedule.


Today I wanted share a recent Design Package that I recently completed for my client Nicole.  I have worked with Nicole before to makeover her living room.  So this was exciting for me to come up with a plan for the adjacent dining room.  Nicole wanted to pull in the grays and then add some splashes of turquoise.

This is the plan I came up with...


The Bar Height Table is already a piece that my client owns, but she wanted a different fabric for the chairs, so I chose a gray and white modern fabric to recover the seats.  


This is such a cute pattern from Waverly Fabric.

Kenroy Home Bronze Gilt Finish Whistler 3 Light Pendant
To keep the clean modern lines I chose this sleek pendant light.  I think the combination of metal and the linen fabric together keep the space contemporary and warm.


Horizon Lines I - Flushmount

For the artwork, I wanted to make it the statement piece in the room.  I not only wanted to pull in the colors of the room, but pull in some colors from the kitchen and other adjoining rooms on the first floor.  I recommended that Nicole turn the artwork sideways so that the lines are vertical on the wall instead of horizontal like you see above.


LIATORP Sideboard IKEA Cord outlet in the back.  Keeps all cords in one place. Adjustable shelves can be arranged according to your needs.


For the unit to store their dishware and dining needs, I chose a sideboard with glass doors and open shelving in a white finish.


One other piece of artwork for the room is this gorgeous medley of metal circles that has a really pretty shimmery finish in silver and gold.  This fun piece ties in well with the metal of the pendant light. 


Here is one last look at all of the mood board pieces brought together to create the design plan for the dining room...


If you are interested in having a Design Board Package for your home including: a mood board like above, the room layout, and complete source guide for all of your purchases, please email me at seasideinteriors01@gmail.com.


June 19, 2013

Sherwin Williams Indigo Batik for Cabinets

We have had a couple crazy weeks of painting and projects and well plain old crazy life stuff.  Last week we finished up the first coat of paint and put the toilet back in the kids bathroom then left over the weekend.  We arrived home to find that the toilet had leaked to the downstairs ceiling and well...

hence the saying "When it Rains, It Pours!!"  ;-)

Well maybe more of a drippage, but none the less, a pain in the butt!

Although the kids were more excited than the adults...

Part 1:  Water Leak


Which turned into this...

On a happier note, my daughter is glad that her initial L is on the ceiling.  Tilt head to the right.

So today the ceiling still looks that way, but since we have had no time to do anything about it, we are pretending it's a skylight and instead we are powering through and painting the cabinets in the kids bathroom.  I had a whole post on some different shades of Navy.  One being Naval and the other being Commodore.  Both by Sherwin Williams.  We used Commodore on my mum's painted striped curtains and then tested it out on an old piece of her furniture.  We knew almost immediately that the Commodore is more Royal Blue rather than Navy so that shade was a no go.  

So it looked like Naval was in the running until three days ago when I came across Indigo Batik!  It is completely the color I was hoping for and as Liz from Life In Yellow mentioned that it is a Navy that is dark enough but doesn't look black and is also Navy enough without looking Royal Blue.  


Now I am about to head out into the garage to help Dustin spray the doors of the cabinet.  I'm nervous about spraying but it will give us a little practice before we spray the kitchen cabinets.

I kid you not, I just stopped typing long enough to go out to the garage to take a picture of the cabinets on the table and found that my husband had sprayed himself completely up his neck and in his mouth since the hose wasn't tight on the sprayer!!

I don't make these things up.   Is it bad of me to have walked back in and shut the door laughing for a minute till I could gather myself enough to go back out?  Really I am a good wife, I brought him a drink of juice to wash the paint down with and I re-wiped all the doors so that they are no longer covered in paint spots.  I'm a winner, lol.

Oh well, wish us luck cause apparently WE'RE GONNA NEED IT!!! 


If you are interested in having a Design Board Package created for a space/spaces in your home, please contact me at seasideinteriors01@gmail.com or visit my website at www.seasideinteriorsllc.com.


June 14, 2013

Preteen/Teen Loft Space Makeover!

To me it is always fun to work in a multi-functional space.  When I was contacted by a recent client, she asked me if I could help trouble shoot her loft area and turn it into something special.  Suzanne's son is at the age of Lego's and drawing and having a space that fits his needs.  When I saw the space I was going to be designing for, I knew almost immediately that it would be a great transitional space for her son to enjoy through his teen years. 

This is the design I put together for their loft area...


For the space itself, the clients were wanting to keep the wall color as it was, so my job was to work around that and bring in some fun things that would allow the wall color to be fun but not overbearing.  By bringing in  a lot of white furniture pieces, it will lighten the room up immediately.  

My favorite find for the room is these Amazing game controller wall decals...


I came across these while looking for some fun additions to my son's bedroom and I thought that they would fit their son's loft space perfectly!

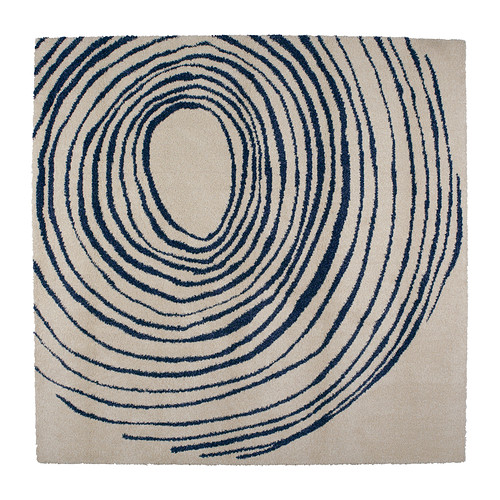
Another item that I thought was fun and funky was this throw rug...

EIVOR CIRKEL Rug, high pile IKEA The dense, thick pile dampens sound and provides a soft surface to walk on.

A fun piece to ground the space!

This loft area was very cut up and had some unique, to say the least, angled walls.  So I put together a Room Layout as part of Suzanne's Design Package.


I created three different zones that will allow for playing, crafting, and gaming.


In the furniture placement, I created a visual for the client of where to put everything.  The detailed description of where everything goes along with all the hints and tips comes in the Source List that I send the client.  

So now when I speak about furniture placement in zone 1 on the source list, Suzanne can just refer back to the Room Layout to get the visual.

Speaking of zone 1, here it is.  The red sofa is getting sold so that will no longer be in the space.  

 Then all we need to do is Scooch the tv down, add a larger media unit underneath the television and put the controller decals on either side of the wall to finish it off.  Throw in two over sized Navy Bean Bag cushions and it's a place where their son can have a blast!  

 This area is zone 3.  All of this furniture will be put back in to the spare bedroom to allow for a desk and two units, one on either side of the desk.   The desk itself is being repainted black and the units are something the client owns.  The black units are similar to these...

Threshold™ Carson 2-Shelf Bookcase

  I want this area to be a spot to do homework and craft, so I added in wall storage like these...

These will go above each unit to store all of his craft supplies and instead of ribbon, I suggested using brown wrapping paper so that he can pull it off the roll and create things with it.

In the middle of the wall units to go over the desk, I suggested a framed out chalkboard, so that he can either draw or keep notes and memos as he gets older.

To left on the lower wall here...
I suggested using two clip rails to display all of his artwork like the image below...


 This area is zone 2.  Again all of this furniture will be placed back in the bedroom off to the left there.  So we are working with a blank slate.  

In this area, I suggested we put the fun rug, along with a large white table to play on, and 6 of these black chairs so that all his buddies can hang out...
JULES Visitor chair IKEA The chairs are stackable and save space when not in use.

Along the back wall where you see the picture frame, I suggested that they add floating shelves to display some of the Lego's that my client's son likes to create.  He is like my son and likes to build them and look at them.  I was the total opposite as a kid, I built something, looked at it for a bit, smashed it, and tried to build something even bigger.  None of this put it together and be done, lol. 

 Under neath the floating shelves, I went with the Ikea Expedit Shelving to add storage and counter space for lamps and other toys...
EXPEDIT Shelving unit on casters IKEA
One in the 8 and squares and an additional one in the four squares to extend down the wall.  I also recommended using straight legs that Ikea offers instead of going the route of stubbing your toes on the casters.  I am a clumsy girl, so I know that I would go flying over these!  Just sayin!

Finally, off to the right on the angled wall, I suggested using the Ribba Picture Ledges from Ikea.

RIBBA Picture ledge IKEA The picture ledge makes it easy to vary your favorite motifs as often as you like.
To create a library area to display books and underneath I suggested a large sea grass style basket to keep all the extra books. 

And here's one more look at the overall Mood Board for the space...


I hope you liked seeing the space and the Design Board Package for it.

If you are interested in having a Design Board Package created for a space/spaces in your home, please contact me at seasideinteriors01@gmail.com or visit my website at www.seasideinteriorsllc.com.


June 03, 2013

Mood Board Link Party: Sand and Sea Beachy Living Room

Today I will be co-hosting with Beth at Design Your Dwelling.  Beth is bringing together decorators and home renovators that enjoy doing what I love:  Mood Boards!  It takes a lot of work to put together a Mood Board for a project, but it is crucial in giving the client the overall feel of how the space will come together.  For my Design Board Packages, I include a Mood Board, a Room Layout, and a Source List for all the items to purchase.   I recently put a Design Board Package for a client who wanted a relaxing and lively living room for her, her husband, and their three daughters.  If you missed the post on their Design Makeover, you can see it HERE.

Here is the finished Mood Board for their new Living Room...

To request a Design Board Package please contact me at: seasideinteriors01@gmail.com.

Head on over and join the party!

Super Simple Requests for participation:

1. Follow Your Host and Co-Host via GFC or Bloglovin'
Host: Beth - Design Your Dwelling
Co-Host: Helen - Seaside Interiors

2. Grab A Button!
Grab a button below and include it in your blog post or where you share your link parties on your blog.

3. Share it!
Spread the word about this link party by tagging me (@beth_dydblog) in a tweet with a direct link to your mood board post and using the hashtag #moodboardlinkparty! Feel free to share it on Facebook too!

4. Like it!
Like your favorite mood boards by clicking the 'like' option below your favorite!

Each week I pin all of your mood boards to my Design Boards board on Pinterest!

Most importantly, connect with, be inspired by and follow other design bloggers!

Grab a button, link up, and have fun! :)

The mood board link party will now be the first Tuesday of each month! The next link party will be Tuesday July 2 - see you then!!