
We started working on my parents house several weeks ago. You can check out the earlier post here and here. Work has gone a little slower than anticipated, but that happens with schedules being switched around and things popping up. We are finishing up the dining room and yesterday I was able to work on her curtains while Dustin put up her blinds and continued prep work and ceiling painting on their extremely high foyer area.
I knew ages ago that I wanted to try to paint stripes on white curtains after I saw Beckie's at Infarrantly Creative. She has some of the most AMAZING DIY's that I've come across!! When my mum and I where at Ikea recently we picked up several packs of the Merete Bleached White Grommet Curtains. I figured you can't beat it for $25 bucks for two curtain panels. If I destroyed them made a boo boo, it wouldn't be too terrible. Seeing as it wasn't my money, lol.
Love ya mum ;-)
Here is my Navy and White Painted Striped Curtains...

A comparison shot of the window area from when we started...

I can honestly tell you I was so scared to do this!! For the life of me, I don't know why. Maybe because I thought it wouldn't turn out as nice as all the other painted curtains I saw online or maybe because the color we chose, Commodore by Sherwin Williams, looked like this on a piece of furniture...

This was only one coat of Commodore paint in the picture. We did three coats in one area and it still had more of a deep royal blue rather than a deep Navy, but when I put it on a scrap piece of cloth, it came out looking exactly how I wanted it. So I said to heck with it and rolled it on the curtains.
I had my brother their telling me he didn't think it was going to work. How sweet, lol. When it was all done, he loved them.
How do you feel about painting fabric? If you've done any projects, where you completely freaked out a little nervous like me or did it not bother you? I think my worst fear was the bleeding through under the tape but overall I really only had a couple little spots that were not visible once the curtains were hung up.
How to GET ER' DONE:
Supplies
1 pkg. of Merete Ikea Curtains in Bleached White
1 Qt. of Commodore by Sherwin Williams
Delta Dreamcoat Textile Medium to make it washable (Joanne Fabrics)
Tape Measure
A Piece of Cardboard Box
Painters Tape
Pencil
A scrap piece of board (long enough to fit across the width of the curtains)
Paint Roller and tray
Plastic Sheeting for Underneath the Curtain
Knee Pads (Since I forgot mine at home, I cut up an old piece of sponge and wrapped them around my knees with blue painters tape)
*A smart Math Dad who does the measurements for you
*A 2 year old niece who asks you 50 questions when you are working
*The last two items are not necessary, but one comes in very handy while the other helps you multitask and prepares you for reality of DIY projects while having little ones around, lol.
Here is the photo of the paint and Textile Medium I used...

DIRECTIONS
STEP 1
Figure out your measurements for how thick you want your stripes. We didn't have to hem the curtains since my parents have 9 foot ceilings. So in comes the Math Whiz dad of mine.
Here is his final measurement of the size of each stripe on the curtain.

We did 10 total stripes with that thickness, but instead of sitting and measuring each 9 9/16 line all the way down with the tape measure, my dad thought up a genius plan!!! Genius I tell you!! READY?
STEP 2

A piece of Cardboard box cut to the size of the stripes, which was 9 9/16. So now all I had to do was go down each side of the curtain with my cardboard piece and pencil mark the stripe.
STEP 3

I love little things like that cause it makes it so much easier on me :-) The only time I used the measuring tape was to mark my first line on the curtain. I went down 5 1/2 inches from the top of the curtain and marked my first line. The reason why I didn't start on the bottom was that Not every curtain is exactly the same length. I learned that quickly ;-) Then from there, just use the cardboard to mark the rest of the way down.

STEP 4
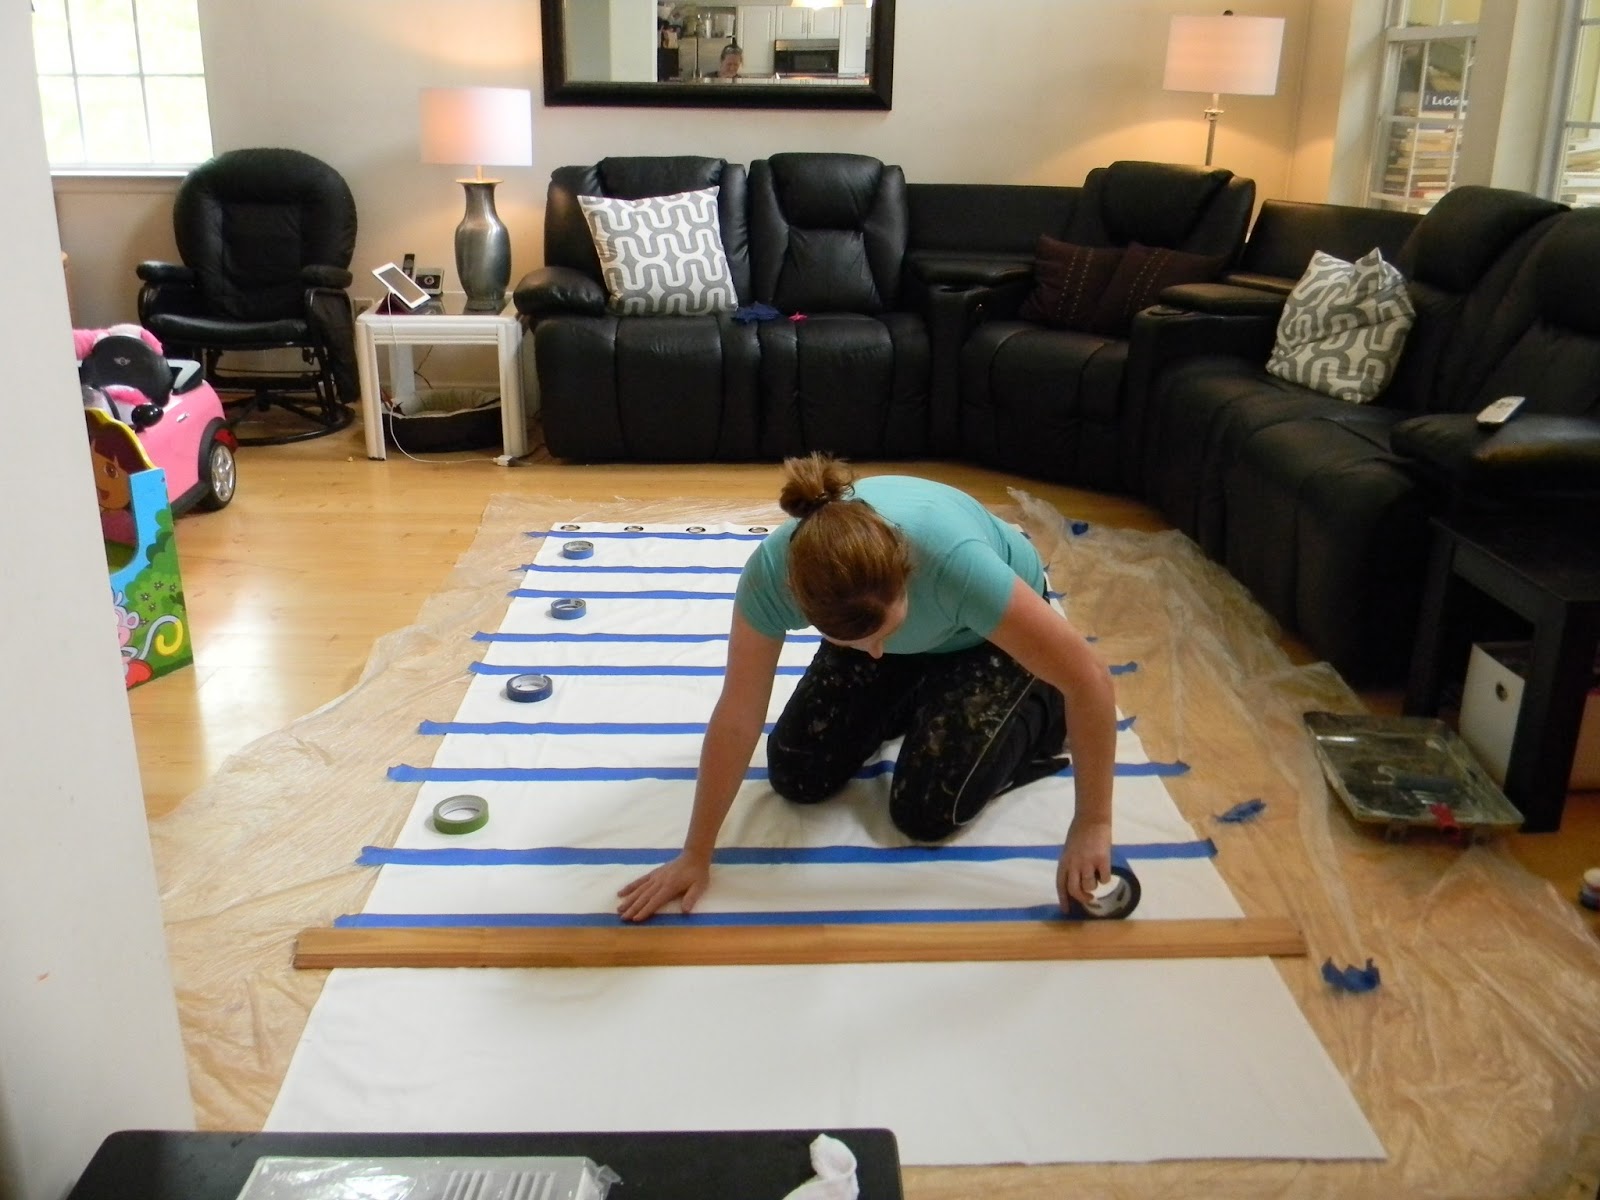
Take your straight edge piece of wood and tape off your stripes. Another great piece of Advice from Becky from Infarrantly Creative was:
Tip: If you are taping off the stripe that will be painted lay the straight edge board’s bottom edge on top of the line. If you are taping off a stripe that won’t be painted the straight edge board top will sit below the line.
So all of my UNPAINTED LINES looked smaller than the painted lines with the tape on them (Once you pull the tape up after painting they are all the same size).

The lines that have rolls of tape on them are thicker looking because the tape is on the outside of those lines, where as the lines that will be unpainted have the tape on the inside of the line. As I worked my way down the curtain panel, I took the roles of tape off the line to be painted. It just gave an additional cue as to which line should be painted.
Take a second to rest with Chatty Kathy...

Notice I still wasn't wearing knee pads at this point: BAD IDEA!! It was after I finished my first curtain that I made the homemade ones :)
STEP 5

Before painting, make sure your tape is stuck down to the fabric. Go back and forth with your finger or nail like I did along the line. Oh yes, and make sure to have your 2 1/2 year old niece there for questioning such as:
What are you doing?
Why are you doing that?
Can I do it?
Why not?
Listen to those same exact questions on Repeat and give the same exact answers over and over again ;-)
STEP 6

Work in small sections going back and forth until it is saturated very well!
STEP 7

When two lines are completed, you can peal off the tape. You will not need to do two coats of paint on the curtains. Again, just make sure to cover it well.

Painted and waiting for it to dry! It really didn't take very long for the curtain to dry. I don't know how long most people waited to hang their curtains after painting them. I am Soooo Impatient (Just ask my husband. He can give you MANY instances, lol). So I put them up between around 15 minutes after I finished the last line. It was dry to the touch. You may have more patience than I and can wait it out, but my mum and I are exactly the same when it comes this type of thing and we where like "feel it, it's not wet, let's get it hung up."

Once they were up, I was able to see a few missed spots, so I just took a little paint brush and touched up the missing areas.
Dustin finished up the window area by installing some blinds I found here.
We still have a few things to finish in the room. The table doesn't look bad in this pic, but in person, it's not so nice. My mum found a glaze online that is called Java and is supposed to be a mix of black brown, similar to the Ikea Stornas Buffet on the left.
We still need to find a rug, hang the rest of the artwork. Repaint the console (that I showed above painted in one coat of Commodore) in Naval by Sherwin Williams and then I think this room is complete.
Friday I will be painting the last two of the Navy striped curtains for the adjacent room that we are turning into and office/sitting area and finishing up the staircase in white, while Dustin paints the walls in foyer area and by the front door.
Have a great Thursday!!!
If you enjoyed this post and don't want to miss out ;-) click up top there on the right and follow along ;-)
For information on my on-line design services, please click here.
For on-site design services {Greater Hampton Roads and Richmond Virginia}, please email seasideinteriors01@gmail.com for pricing and availability.

LINKING TO:


They came out great! I've been thinking about trying this too. I have some cheapo white curtains calling my name.
ReplyDeleteAmazing! I would never think of something like that.
ReplyDeleteI would have never had the nerve to accomplish it without several great bloggers sharing their finished projects before hand!
ReplyDeleteWhere does the textile medium come in to play? I didn't see it in the directions, but could have missed it.
ReplyDeleteThe textile medium is added to the paint to help it be more durable if you have to wash it.
DeleteWhat kind of fabric are the curtains made from? I have white polyester currents and am debating on using the same paint you used.
ReplyDelete1 pkg. of Merete Ikea Curtains in Bleached White. I think they are a soft cotton blend.
DeleteWhat fabric are the curtains made from?
ReplyDeleteThe curtains are 1 pkg. of Merete Ikea Curtains in Bleached White
DeleteI did some of these over the weekend with sailcloth curtains. The paint when straight through the fabric and half of it ended up on the drop cloth. You can see straight through the blue when you hold the curtains up to the light. I'm not sure if I should add a liner to the curtains, or since the paint is dry, just go back and do another coat of paint?
ReplyDeleteHi Shannon, I haven't used sailcloth before, but it sounds like it may be a bit thinner than the Ikea curtains I used. I would recommend adding a heavy liner. That should block out the light a bit and allow it to not show through the fabric as much. Hope this helps :)
DeleteDoes the paint stay "crunchy" or is that what the fabric medium is used for? To soften the paint? Thanks! and Also Can you use interior Glidden paint? I painted a back wall in my sons room navy blue and I think this paint color would be perfect for office bay window curtains. But since they're are 3 windows I don't want to paint alllllllll those curtains if it stays crunchy! Thanks!
ReplyDelete