February 29, 2012

DIY Starfish Art

Since we have been working really hard to complete our living room makeover this week, I decided to create a small diy art project for one of the smaller walls leading to the dining room.  I am coming to the end of my budget for the living room, so I am trying really hard to make every dollar count.  Too many ideas, not enough Mula!  A vicious cycle :)    I looked around the house to see what I could come up with and this is what I found...
 

So that got my mind a thinkin'...

I took two small canvases (leftover from a previous project), Sea stars (2 lg. and 2 sm.) that I purchased in a pack of 12 from Marshall's, and some flat white Krylon spray.  The great thing about a blank canvas is that you can hot glue all sorts of different objects to it in order to create 3 dimensional art.  For a really cheap price too, whoo hoo!


I threw them on a tarp and did 3 coats of white. I waited about 30 min- to an hour in between spraying.  In the pic above, it looks like the starfish and canvas are white, but the canvases are kind of a gray white color and the starfish were cream.  So, I wanted a nice white for both.


When everything was dry, I got the next items together...


Using a piece of twine, I measured the distance from one side to the other and I included the distance of the side since I wanted to wrap my twine over the ends.  Then I cut three additional pieces of twine and laid them out on the canvas.


If you are Wonderin' why I have the starfish on before the twine, well...   I had originally decided to just have an "all white" canvas.  White starfish, white canvas, but that didn't do it for me.  So I thought of the twine ball I have, just waiting to be unraveled and put to use.  I ended up having to work my twine underneath the starfish, but it worked out alright.  Apparently, I think backwards, but that is nothing new my hubs couldn't tell ya! 


So, this is where you will glue down the twine to both ends of the canvas.  If you have any hanging over after you have hot glued it, just trim it up.  Finally, throw a few dabs of hot glue under the starfish and adhere it to the canvas.   And finito!!


  Here they are in their new home.


The only problem is, besides that they look a little wonky in this shot, is that I thought these two happy twins would look better as triplets.  Don't ya think?  I think the wall is tall enough to have three and it would make more of an impact.


So, it says "NICE,"  but I want it to say "Oh Yeah,"  :)   I can't be too fussy about since I made it "for freeeeeee"! 


Linking to:
Tip Junkie handmade projects

February 28, 2012

It's a Dog's Life

So today, our baby turned one...


Not the one on the left, but the tiny 11 pounder on the right.  This was the day we got him. 
                                   

This is him now...


He is not an 11 pounder anymore!  He has been an awesome addition to the family!  


So, I came across a dog pillow the other day, in the same accent color as our living room.  It was on clearance at TJMaxx for $15 bucks so I couldn't pass it up. 


He has been loving his afternoon and evening naps on it. 

But I realized something was missing when I came across this picture on Pinterest...


So as a gift for our special guy, I thought I would build him this, or something like it.  Especially since I have these out in the garage...


Looks like I will be heading to Lowe's this weekend for some casters for the bottom, while my husband cuts these up for me.  I will show you Dozer in his new bed when we complete the pallet bed.

February 26, 2012

Cookies and Milk Party

Well, before I got into loving interior design, I was into design of another kind. I have always seen design in different things. So, when I had my kids, my love of design went into throwing their birthday parties. It was my son's second birthday when I realized how fun it was to decorate cakes to match the theme of their party.
Today I would like to share with you my niece's first birthday party.

The theme for her birthday was Cookies and Milk.

Here is the birthday girl!

           Isn't she so sweet!


A shot of the dessert table.  We dipped glasses in chocolate sprinkles for an extra yummy treat and covered some Styrofoam boxes in pink wrapping paper to put under the cookies.


Here are some of the fun treats up close...

 I took some Starbucks bottles, peeled off the labels, and added a little cookie and
and milk sticker that I printed up.  I purchased the pink and white paper straws from www.littlelulu.com.


 My sister picked up these Carafe's at Walmart for just a couple of dollars each.  I just designed some simple tags for the front of the bottle and attached them onto some ribbon.


 For the chocolate chip cookies, I took a circle cutter  to cut out the circles and then cut the bite mark with a scalloped round cutter.  The icing on top is two different colors of royal icing.


 One thing I like to do if I don't have an actual cookie cutter shape, like these milk bottle cookies, is to print up the picture online and cut out the design.  Then I just use an Exacto knife and cut around the paper while it is on top of the rolled out cookie dough.  If you want to keep the template, then you can just place it in clear contact paper and cut around it a second time.


Some Big # 1's


This is the cake I did for my niece.  I iced it in pink buttercream and molded the small cookies, milk bottle, and other cake pieces out of fondant.  The big cookie was a rounded rice krispy treat covered in fondant.


For the party favors, my mum and sister made all sorts of yummy cookies.  I always collect different jars from TJMaxx and Ross.  So we utilized them here.  The kids thought it was great because they could fill their goody bags with all sorts of cookies.


 Every one needs a smash me cake. Yum Yum! 
I took a 6 inch round cake and carved it down to look like a chocolate chip cookie.  Then I just put some light brown colored buttercream on it and slapped a few of the brown fondant dots around and called it done. 


A few final decorations...

Tissue paper pom poms were hung around the room.

And that was the end of a happy birthday for my niece!

We've Been Framed

Today I wanted to share with you one of the projects for our living room. 
When my M.I.L. was getting ready for a yard sale last year, I went snoopin' in the piles of things she was getting rid of and I came across a stack of black picture frames. JACKPOT! She had purchased all these frames from Michael's over the past few years.
So, I brought them home and decided that  I wanted to display our family trip to the Outer Banks, N.C.  in them.  I was able to get some really great photos of the house we stayed in.  It was a 1900's refurbished hunting lodge.  It was right on the water in a quiet little Cul-de-sac.  We had a lot of great memories there!  I was able to snap shots of the kiddos on the beach, the family fishing off the dock, and my guys canoeing.  I think the funniest picture I took is when my daughter got mad at her cousin and sent his flip flops floating in the water.  Luckily we were able to retrieve them. 

After traveling around Pinterest and my favorite blogs, I came up with an idea for the larger wall behind our couch.  Why not do a gallery wall?


Here are a couple of the inspirational pics that I came across...


Pinned Image


So I put my trusty husband to work...   


He measured out where the pictures where to be placed by drawing up a template.

It may be hard to see here, but he measured the distance from window to window.  Then he measured the distance from the top of the couch to the top row of pictures. He measured the distance from the window to the start of the frames on each side, which was 15 inches.  He was left with 58.5 inches width of the picture area.  A tip when you want the pictures to have the same width all the way around is to always measure top to bottom (height) first.  That's how he does it. 


 Here is a close up of his sketch.


 Doin' good!  Four down, eight to go...


 Is he measuring or reminiscing?  I can't tell.  Eight down, four more to go...


 And we're (apparently I'm French, since all I did was hold the camera) done...   I am so happy with how it turned out!  Wait... I did choose the pics, clean them up, print them, and put them in the frame, so I can say Oui or We did it.

 I wish I could show you how it looks over the couch, but you will have to wait for the finished living room post, mwahaha!  Hopefully, that will be completed this week.  The blinds arrive Monday and I have a little work to do on the drapes.  Today I am heading out to a local antique shop to find an old ladder to display my throw blankets.  Wish me luck!

So, I will leave you with a few up close shots of our trip to the Outer Banks.

 My wild and crazy daughter on the upper deck of the house.


 A shot of her carrying sand back and forth on the beach.

 One of the upper decks. See what I mean, relaxation at its best!  Just looking at this picture makes me feel at peace.


 Here are my guys canoing.

 Here is the house itself.  It was so beautiful waking up in the morning and looking outside!

And here is the "infamous floating flip flops" picture.  Definitely my favorite shot I took!

So don't forget to check back for the post of the completed living room!!!

February 24, 2012

Daughter's Parisian Room

     Today I wanted to share with you my daughter's bedroom makeover...

     Since my daughter is 8 years old, I wanted to give her something fun and funky, but I also wanted her room to transition with her as she grows up.  She loves fashion and design, (a girl after my own heart) so I knew I had to incorporate that somehow into the design.  When I showed her some ideas for a new bedroom theme, she really gravitated towards the colors and design of the Parisian style room I created!
      I don't have any before pics, but it was just an ugly blank cream slate until we got ahold of it.  My husband did the horizontal stripes for me, cause he is Awesome like that!  So, here is the finished product...


 Here is the shot of the room from the doorway.  It was a little hard to get the entire room in one shot since her room angles at the door.  The turquoise color is Belize by Sherwin Williams. 


Every girl needs a few model shots.  I got these pictures at Home Goods.  I just really like the sketched look of this artwork!

I wanted to give her a place in her room to do homework or draw, so I put together this desk area.  The desk and pink desk lamp are from Target.  The photobooks on her desk are from TJMaxx.  She loves having them there to look at all of the pictures she collects. 

This chair came with a really old desk at a yard sale and was in very poor shape!  It was a darker brown wood with some sort of 80's dingy fabric.  So I painted it white, padded the chair out and covered it with a piece of polka dot material that I purchased from fabric.com.  I added the piece of material on the top of the chair by hotgluing a piece of fabric around the chair.  Then I trimmed it out with some green ribbon using non other than my trusty hot glue gun. 

The shelves are from Ikea.  They were originally the light brown wood color that Ikea sells, but we needed to match the room, so we sanded them down a bit and sprayed them black.  The accessories on the shelves all came from TJMaxx.  The Dream sign was originally a weird blue color, so I sprayed it a deeper shade of green.

The lamp and jewelry holder are from TJMaxx.  I bought two of these lamps.  It's buddy is in my son's room. To add a bit of color to my daughter's lamp, I took the base, which was originally black, and painted it the same deep green color that I painted the Dream sign with.  
 I purchased the pedestal table at Target (the table is seen better in the whole room photo).  It was on clearance from $79 to $19 (since it was pretty banged up), so I used a black permanent marker on a few spots and the for the rest of the touch ups, I used a sponge brush and painted it black.   Good as new!

Here are some other accent areas...

I just took a mannequin stand, sprayed it black, and added a pink piece of material for the sash around the waist.


This is possibly my favorite part of the room!  I ordered this wall decal online from Etsy.com from a shop called Vinyl Lettering.  They were amazing with assisting me in getting the right size and look for the room!  I wanted something that screamed "PARIS" when you looked in the room, so I think this did the trick, he he, get it!


 These are hat boxes and a plant pot I got from Ross Dept. Store.  The great thing about this is that it adds extra storage and looks pretty all at the same time!  To add some detail, I hot glued some black and white polka dot ribbon around the tops of the hat boxes and then a smaller polka dot ribbon on the pot.  I added some moss I got from Michael's to the pot. I found some twigs in my woods out back, sprayed them white, and added them to the plant pot.


An accent lamp that my M.I.L. gave me.  It went Perfect with the room.


This is a picture of the inside of her cabinet.  You can see the outside of the cabinet in a later shot.  The cabinet is from Target as well as the pink bins.  All other accessories are from TJMaxx.  I wanted my daughter's room to stay organized, so on the top shelf, I put all of her earings and jewelry in one spot.  For her bedtime reading, she can just grab a book from her middle shelf and put it back without the books falling all over the place.  I wanted her to be able to reach her socks and undies, so I put her bins on the bottom shelf to keep things clean, yet still allow her to access them.

 
To organize the tubs, I just cut a piece of cardboard box into squares and painted them with chalkboard paint.  Then I wrote on them with a white chalkboard pen, poked a hole in the top, and attached them to the storage tubs with a piece of green ribbon.  Ta DA


To me, this kinda says "Having Fun in Paris."  The girl shopping and the Eiffel tower were from TJMaxx. Can you tell that I LOVE that place!  The stack of suitcases came from Land of Nod.  Even the stack of suitcases are for storage.  She keeps trinkets and other bits and bobs in them that she doesn't need to get to on a regular basis.


Here is a picture of the dresser unit that I purchased at Target.  It is a matching set with the desk.


Into the Closet We Go...


To keep her winter things out of the way and seperate from her summer stuff, I purchased two bins from Walmart, painted a square of chalkboard paint and then labeled them "Winter Clothes."


I wanted my daughter to be able to find clothing items easily and put them away where they go.  I know, that's asking a lot, lol.  So, I purchased this tub drawer set (that's the tecnical term for it) at Walmart.  Like the Winter storage tubs, I painted some more chalkboard squares and labeled them accordingly.

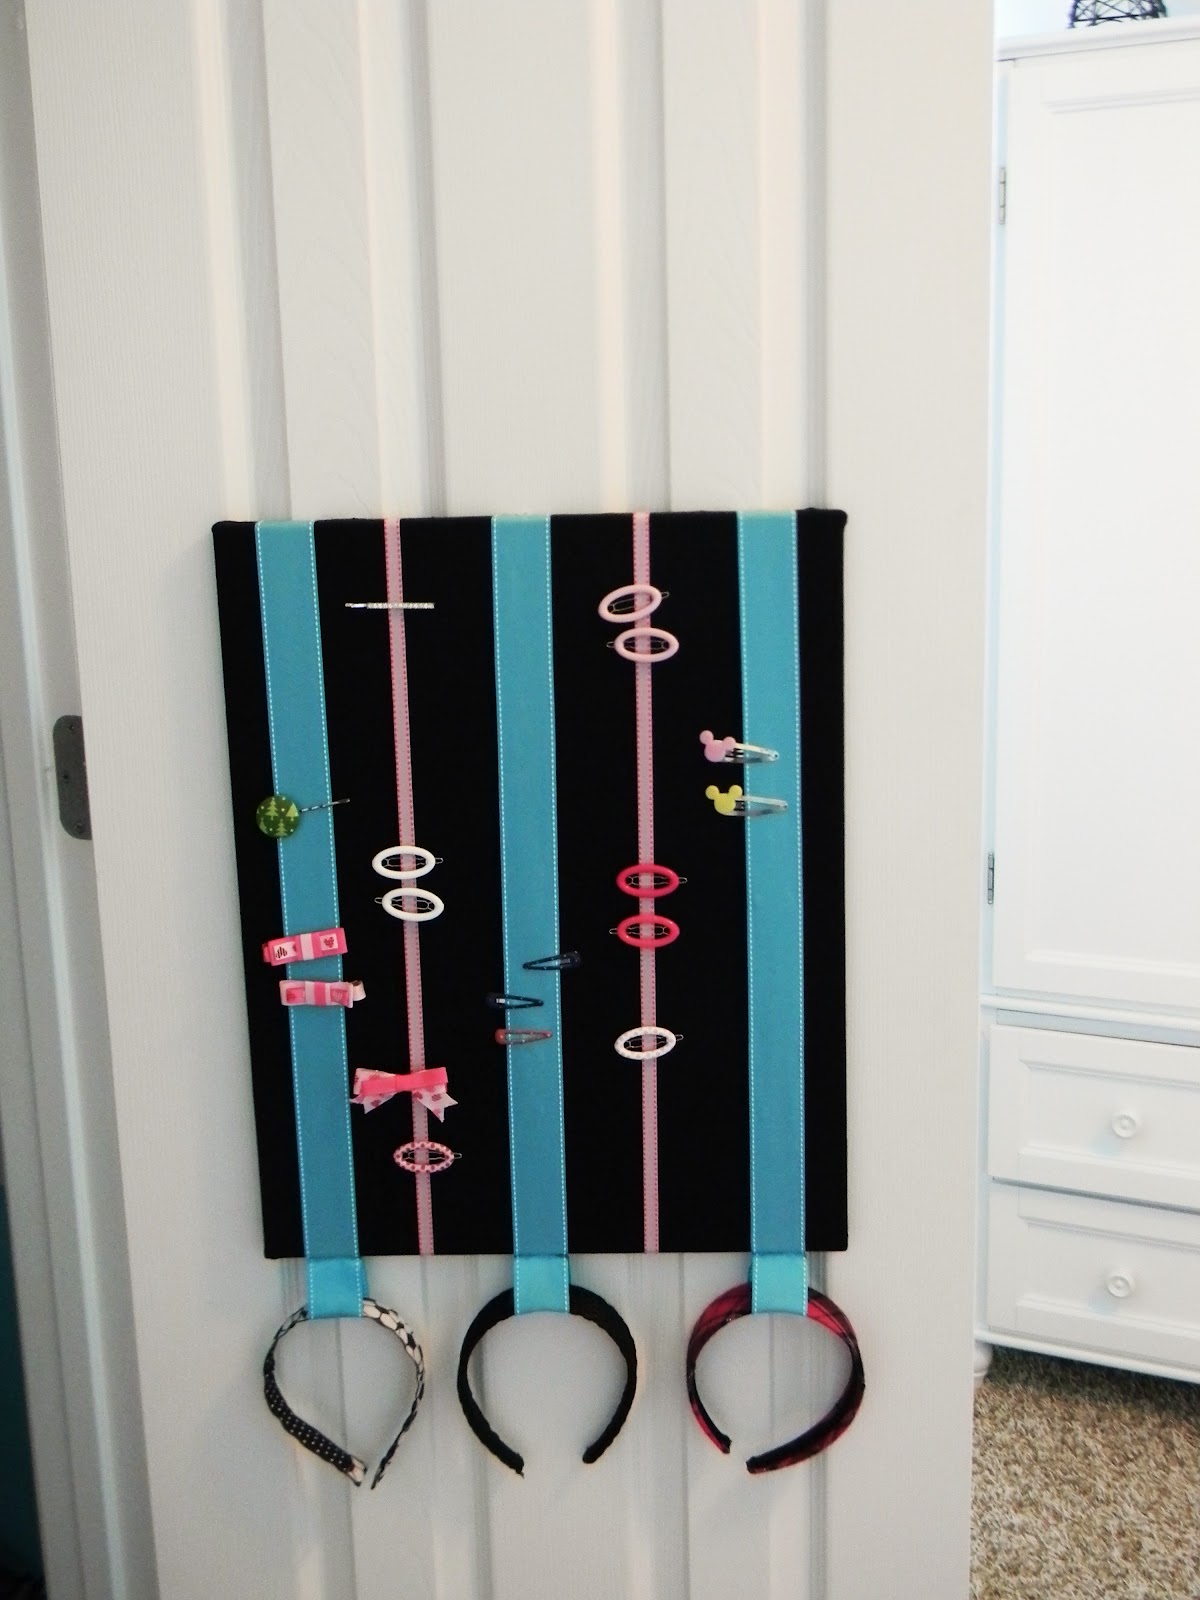
This was a more recent addition to the closet.  I added it after the first pic was taken.  I was so frustrated trying to find hair clip and headbands, so I made this hair organizer for her door. 

 I don't have any "how to" pics since I didn't know I was starting a blog when I did this project ;). 

But here's a few directions: 
To make it, I covered a canvas in black material.  I took my heavy duty staple gun and attached a piece of black material to the canvas, stapling on the back side.  Then , I adhered the  ribbons; 3 blue and 2 pink. I stapled the ribbon over the back also.  To add the headband holders, I measured three pieces of ribbon, put each into a loop shape and stapled each of them on the side of the canvas.  Once you hang the organizer up, you can't see the staples for the headband area. 


Here is a shot of her bed in all its glory!  The bedding is from Target.  The bed skirt is just a piece of leftover material I had leftover(same material I used on the chair).  The headboard is tufted, although it is hard to see in the pic.  The headboard is from JCPenney's. They have it in turquoise and I think white too. 


 All the pillows are from Target except the zebra print one, which is from Walmart.

  I hope you enjoyed your mini trip to Paris!


Linking up to:


Home Stories A2Z


spread the joy

                                                        HookingupwithHoH