August 25, 2012

A PINTERESTING Evening!!!

Today I thought I would share a couple recipes that I made from Pinterest the other night.  Hence a pinteresting evening, lol.  I make up these cornball titles really just to annoy my little sister, since I love to see her roll her eyes at my cornyness (sure, that's a word).  Why?  Because deep down, I know my sister loves my cornball side way more than she would like to admit, lol. 
 
Oh, also, this was in fact my second time this week making these recipes. ;-)  I had a girls get together for makeup tips a few days ago and we liked them so much that I made them last night when my sister came over. 

I figured since I pin all of this great food, I should probably start making some of it.

I decided to go with the Zucchini Boats and Cheesecake Stuffed Strawberries!  Yummy!!!
 
I should apologize in advance over the lighting for the photography.  I took the pictures in the evening, so they are a little dark.
 
Here is the end result:

ZUCCHINI BOATS


CHEESECAKE STUFFED STRAWBERRIES


You can find the recipe for the Zucchini Boats here and I just followed the picture for the strawberries and did my own. 

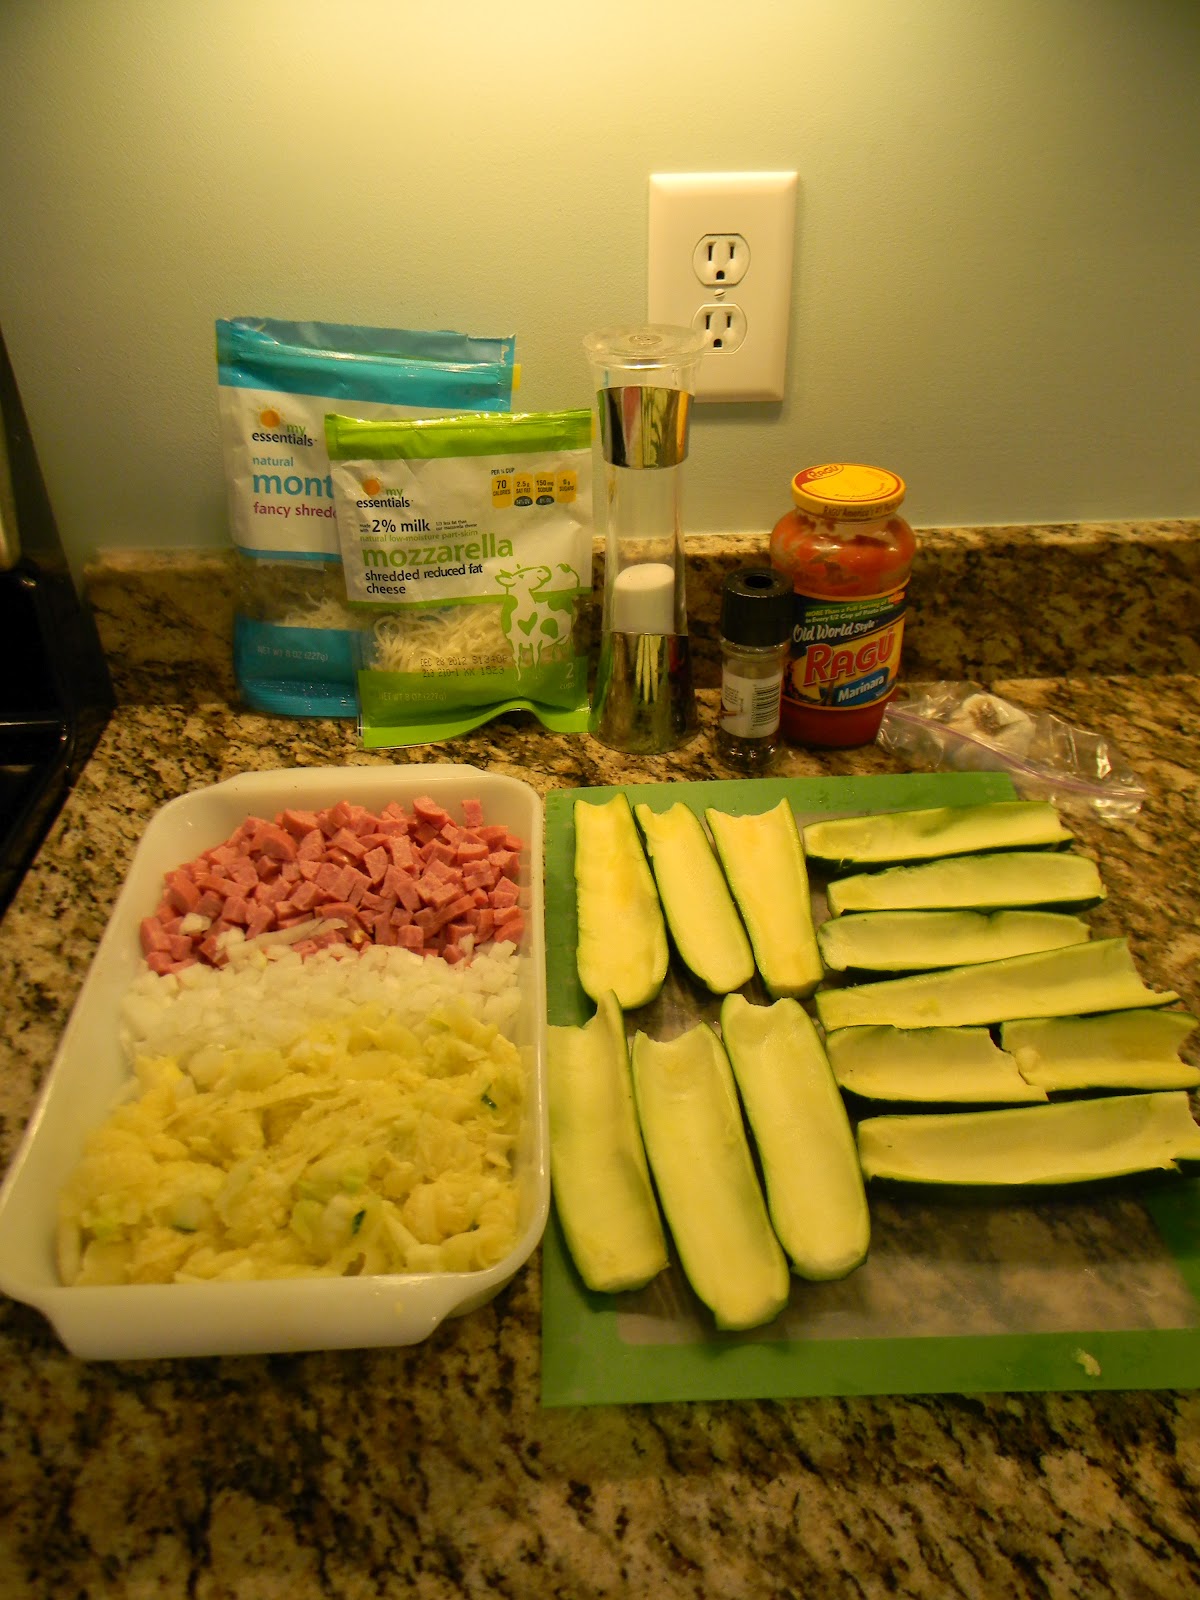
Here are the ingredients I gathered for the Zucchini Boats:

 
Yield: 12 zucchini boats
 
                                                                Cook Time: 30 min
                                                                 Prep Time: 30 min


Ingredients:

Six medium (8-inch) zucchini, ends trimmed, then cut in half lengthwise
1 tablespoon olive or grape seed oil
1  finely chopped onion
6 medium garlic cloves, minced
1 1/2 -pound lean turkey sausage
1 cup Parmesan cheese
1 cup mozzarella cheese
1 cup tomato-basil marinara sauce
3 tablespoons chopped fresh basil or 1 1/2 tbsp dried
salt and pepper


To make the Zucchini Boats, I cut 6 zucchini in half and scooped them out.


Then I cut up two turkey sausage, like the ones below...


I also cut up an onion and a few pieces of garlic...


Then on to the saute part:
 

I used grape seed oil to saute, but you can use a little olive oil or whatever you have on hand.  This is the one I use. 


I find a lot of specialty items for pretty cheap at TJMaxx.


Once your zucchini, onions, and sausage has been sauteed, mix it with a cup of mozzarella cheese, a cup of marinara sauce, and fresh or dried basil and fill the boats up.


I topped it with mozzarella cheese, but the time before when I made it, I topped it with flaked Parmesan and I liked it better with the parm.
In the oven at 375 degrees for about 30 min.  and get your knife and fork ready to chow down!


In the recipe from Pinterest, she made rice as a side, but the zucchini boats and stuffed strawberries where plenty for us.  Which really means I was too lazy to make the rice. 
 
 
Yum! Yum!
 
 
Ok, so for the Cheesecake Stuffed Strawberries, I found this picture on Pinterest...
 
Pinned Image
 
 
So I couldn't resist and made some of my own.
 
First thing to do is make the cheesecake filling
I followed the directions on the box and mixed it with 1 1/3 cups cold milk on med. speed for about 3 minutes.  Then I let the filling sit in the fridge for 30 minutes while I took care of the strawberries.
 
 I rinsed, dried, and cut the tops of the strawberries.  Then I made an x on each one, just make sure not to go to far down, but if you accidentally do, just use the cream cheese as the glue between them.  No one will ever know ;-)
 
 
When the filling was ready, I took a clear Wilton bag and put a tip 12 in the bottom and filled up the bag with the cheesecake filling. 
 
 
Then I filled each one. 
 
 
 And finished with sprinkling the graham cracker crust on the strawberries. 
 
Now you can eat three one to test them out before everyone else eats, you know, just to make sure they are safe ;-)


August 20, 2012

Before/After Fabric Bench Makeover


Sometimes when I look at decor, I like the simple feel of a piece and other times, I feel that I need to add a little something to it to finish it off.  Well, when I went searching for a bench for the base of a client's king size bed, I came across this...


I thought it would fit in the room well, but I wanted to give the client a more comfortable spot to sit.  So I gathered a few materials.

Material List

Hammer
Polyfill Batting
Fabric
Spray Adhesive
Nail Heads
Stapler
Scissors
Iron
Foam


 I used 7/16 in. nail heads in silver.  I purchased these at Joanne's Fabric, but if you are in need of a larger amount, purchasing online is much cheaper!


 I use this guy on a lot of projects.  I get mine at Walmart, but most fabric store sell it.


This is the batting that lays over the foam base to soften the edges of the foam. 


I ironed my material on the backside, since my design on top was a felt material.


 Then I sprayed the bench with the adhesive before I put the foam down.


I bent my piece of foam in half, sprayed the foam again, where the other half came down on top, and then, read carefully, this is technical stuff... 


 I sat on the bench, very important step, ;-)   I sat in different places on the bench for a couple minutes, just to make sure the foam was stuck down well.


 A little closer shot of the sandwich effect!


 Step number I don't know I haven't been counting,  throw your batten on top of your foam and throw a little adhesive on top for good measure. 

Then add material and when you gather enough strength, hold everything tight and flip the whole thing over.

 Take your staple gun and pull the fabric, not too tight, but tight enough and staple all down one side. Go to the other side and do the same, then staple the short ends. 


Go back and look to make sure you don't need a few staples anywhere else.
When you're finished, cut off any excess material and batting, oh, and I forgot to mention, I used an Exacto knife to cut it down even closer.

 
Flip the bench back over and
then take these guys...

 
and your hammer and go to town nailing all the way around.

 Stand back and admire and tell the bench how pretty she looks! 
What, you don't talk to your furniture, they're just like plants you know, lol! 

And that's it, a beautiful fabric covered bench :)

August 16, 2012

Seaside Interiors OFFICE MAKEOVER Plans

So for bleeps and giggles, I put together a design board for our upcoming office redo ;)

The office is the first room when you walk in the front door just off to the right and it is the room where my clients get their first impression of me.  So I want to make it fun, whimsical, and inviting!!!

 
Here is what I have planned...

You may notice the pillows are from a recent room plan that I am working on for a client.  They may not be the final pillows in my office, but they are the color combo that I love!!!


SO WHERE DO WE BEGIN?


Right now, the room looks like this...


I have been wanting to do a sliding barn door or two on the wall to the left in the picture below...
This shot is from the living room side, the office is off to the left.  So, that wall will need to be closed in enough to allow for the sliding doors and hanging brackets above.  We are hoping that new wood floors throughout the first floor will be in the budget, but we will have to wait and see.   

I have some ideas for this entryway area too, but I will share those plans later when I get them finished off... 

For the barn door, I would like two doors in white with glass window inserts.  That hallway doesn't get much light, so I want to keep the light from the office windows flowing through into the hallway. 

 
This is similar to the door I want, but with the look of two doors like below.


HEADING INTO THE OFFICE...

 Here is the nook area is where I want to make or put the purchased metal and wood shelving units.


I think these will be great for storage baskets, files, and other office supplies along with a few pretty accessories. 


In my mind, if we are able to build the shelving, I want the desk height shelf to wrap around in an L shape and extend down the wall on the right.  Here are a couple rooms I pulled to give you a visual of what I mean...


If you know of the sources of either of these rooms, please let me know so I can give credit.  These pics came from a file I had.   This is the gray I want the walls to be too!

Cb2 sells these gorgeous chartreuse filing cabinets. I think three, one on either end and one in the middle) will go great underneath a reclaimed wood table top. 


Instead of the plastic tub chairs, I have spotted chairs very similar to these bad boys at TJMaxx for much less than I have found online and since my husband has just started his own paint business we will need two of everything  to keep the businesses separate and organized!

Above the desk along the back, I want to do some sort of shelving and below the shelving, I would like to cover some cork board in a pretty material so that I could use it as my inspiration boards for projects or for the hubs to keep track of his jobs.


 In this spot, I want to say bye bye to the big bookcase and put in a console table.


I love luv lorv, the turquoise one, but the price is way out of my budget, so unless I can find something similar to paint, I will probably go with white x console table.  The one on the left is one I found online and again, is a bit pricey for me, so I found Ana White's design that I would like to replicate at a fraction of the cost. 

On the wall above, I will have some sort of artwork and on top of the console table, I am going to put wire baskets to store decorating magazines for the clients and myself to reference when we are in the office. 

On a recent trip to HomeGoods, I found these ones, and snatched them up for $9.99 each...


They may stay this color or become a pretty silver, not sure yet.  I don't know what it is about numbers on things, but they make me happy!


 I figure some artwork on the wall in between the windows will look nice. 

In the center of the room, I want to have a desk, with an upholstered chair for me in some fun fabric and two comfy, possibly white chairs for the client.


I will have to see which color or finish I choose, probably the white,  if the console ends up being turquoise or maybe the turquoise if I go with the white console, decisions... decisions...
 I threw the reclaimed wood one in because I love it so ;-)  And if by chance the table tops along the back wall are white, then I will still want some reclaimed wood somewhere. 


 I picture the client's seating on the opposite side of the main table, with a small accent table in between.

Ikea's white Ektorp Tullsta chairs for $129 look mighty good to my wallet.


What's left to think about, ummm...   rugs, ceiling lighting, accessories.  Well, I am off to search for the missing pieces. 

If you are interested in having an affordable design board created for a room in your home like the one below,
Please click here.

Linked To: