Showing posts with label Minecraft. Show all posts

February 06, 2013

A Fun Minecraft Party!


We survived the Minecraft party!  There was a lot of fun things that we were able to create for my son's birthday.   You can see the invitations here.   The boys had a sleep over that started with tacos for dinner.  Then we opened presents and ate cake and other desserts.  After dinner the boys played the Minecraft game against each other and finished the evening off by building the Minecraft pig and creeper.  After that, they were free to wear the Steve Heads and jump into a bunch of boxes that Dustin painted gray for them to build and destroy.  So today I thought I would catch up on all of the decorations, food, etc.

Here's the party...


 This is where the kids ate and did the crafts later on in the evening.  
My friend and I worked for quite a while on the windows to make them look like the Minecraft glass.  Just some scissors and white electrical tape did the trick for the windows.  I added some blue diamonds on the table and the Steve Heads in the center to finish it off.


I had my husband run to the UPS store and print up the pdf file for the Steve Heads.  He also picked up two 10 x 10 boxes to use for the heads.  You can get the directions for the Steve Head here.

A little black electrical tape and some green balloons and I had some hanging creepers.
 We continued with the white electrical tape on to the sliding glass door.


For the drinks, I went with bottled water and creeper juice in creeper cups. 


The cups were also done with black electrical tape.


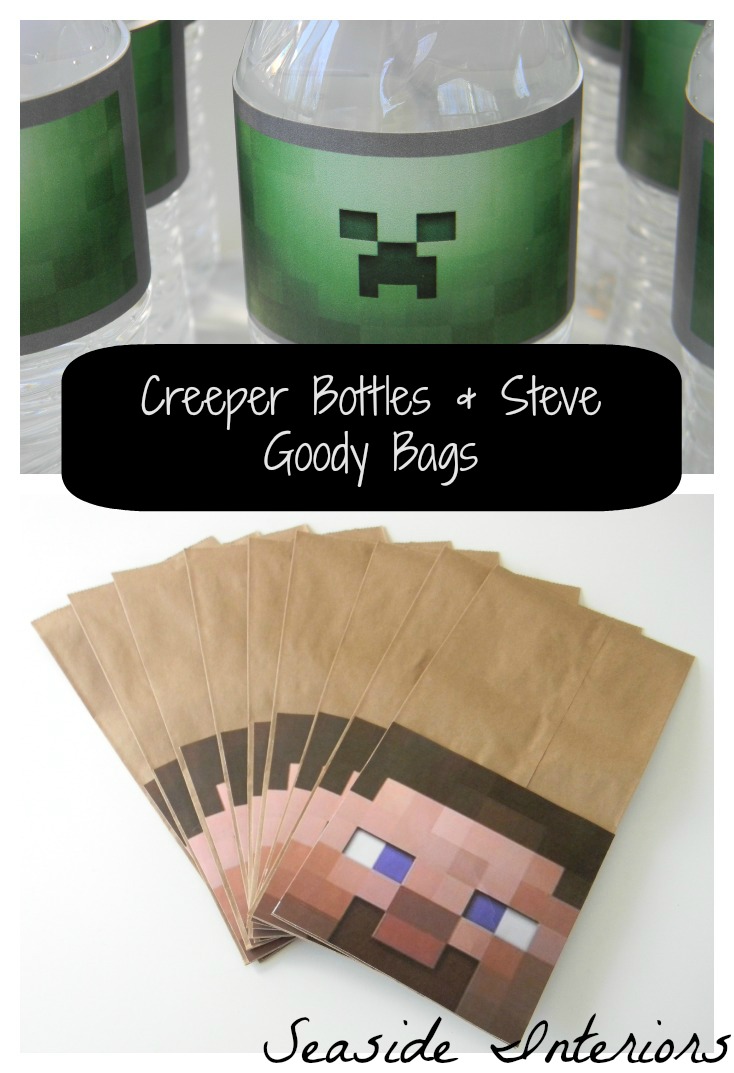
I made the water bottle wraps using Photoshop.


The creeper juice was created from a bottle of 7UP, a can of limeade, and a bit of green food coloring.
* Crazy kid behind the creeper juice not included ;-)


Cookie Decorating


Krispy Coal
Since Coal is a big part of Minecraft, I thought creating some Rice Krispy coal for the kids to eat would be fun.  I followed these directions and changed the method of heating.  I always use the microwave where I can.  So I got a microwavable bowl and threw in the butter and marshmallows and warmed them up by using the defrost button.  I just kept checking and stirring every 30 seconds or so until it was all combined.  Then I added the black food coloring and the krispies to finish it off.  It helps if you spray the bowl with Crisco spray so that the marshmallow doesn't stick. 

I loved creating this Minecraft shirt using freezer paper.  It was so fun and easy that I made two of them within 30 minutes.  Check here for directions.  I ended up drawing mine on graph paper like the directions show, since the link to the template did not work.

Supplies
Shirt
Freezer Paper
Fabric Paint
Exacto Knife
Cutting Mat or Cardboard
Paint Dobber or Sponge


Minecraft Creeper Wall Display

This guy took four packs of plates to create.  I found the idea Here.  If you are looking to do a smaller version of it, then you can just use the dessert size plates.  I think that's what they did in the link I found and it was a good size.  I used dinner sized plates to create mine. 


The Dessert Table

I made some signs for the dessert table and created the boxes for the TNT dynamite on Photoshop.   I know I mentioned that I would show a couple hints on how I make cakes, but I had to put it together in a really short amount of time so I will give some hints on an upcoming bridal shower cake I am doing in a few weeks. 


I cut an old small Kool-Aid box in half and wrapped the TNT sign around it.


Really quick and easy Minecraft cake.  Might just be the easiest decorated cake I have made before.  I was pretty excited considering the fact that I was running out of time on the day of the party.


Minecraft Creeper Truffles

I used the same method to make the Creeper Truffles as I did to make my daughter's Lego Truffles.  I finished it off by adding the creeper face and some Minecraft tags I made in Photoshop.


To finish the party up, we made some goody bags and filled them with Minecraft things.

I was originally going to do Green goody bags with Creeper faces, when I came across this design using Steve faces on XL Paper bags.  I thought this was way more inventive.  I found the idea for the bags and the candy bars Here.  I also added some of the blue plastic diamonds to the bags.  The ones that you can see on the dinner table in the picture at the top.  I didn't get a chance to take pics of the last two items that I added to the bags.  One was a lump of krispy coal that I put in an individual clear bag and attached a green and white krispy coal sticker.  The other was another TNT treat.  I put a TNT card in clear treat bags, threw in some twizzlers and tied it off with some twine.  These were actually my favorite, so I wish I had some pics of them :-(

Oh yes and the banner was a free printable that I found online Here.
I printed an additional page of the Creeper face so that I could make two banners out of the one.

All in all the party was a lot of fun and the kids seemed to love it, especially this guy...


If you enjoyed this post and don't want to miss out ;-) click up top there on the right and follow along!


For information on my on-line design services, please click here.


For on-site design services {Greater Hampton Roads and Richmond Virginia}, please email seasideinteriors01@gmail.com for pricing and availability.


Seaside Interiors


January 31, 2013

Sneak Peak into the Minecraft Party


I am just coming up for a quick breather while I am working on a Minecraft Party for my son.   Last night I made some Minecraft things on Photoshop to go with his party.  I will share a few quick and easy tutorials/how to's this week for what I have created so far.
This morning I baked the cake.  I baked up two 10 in. square cakes in order to create the Minecraft cake.  I will share a few of my decorating tips in an upcoming post!
I have been searchin' around online to find some Minecraft Ideas, and I found some awesome ones!  I created some candy bar sleeves and printed and attached Minecraft animals to each one: details to come.  I will share my sources in my next post when I do a little tutorial on the wrappers.  I am getting excited for this party to get here :)   The tnt is pop rocks.
Some water bottle wraps I created on Photoshop and Steve Goody Bags Using XL brown paper bags.
And finally,
Minecraft Coal
It started out so pretty and fluffy, and ended, well... not so pretty.  But that's the point of it and I'm hoping the kids will get a kick out of it. Recipe to come in the following post.
Now, back to the kitchen to finish off the truffles, bake the cookies, and possibly get the cake decorated tonight.  Oh, and you should see my house, it is SPOTLESS!  If you categorize spotless as having the sink filled with dishes, every counter filled with junk, and the laundry piled up, then yep, MY house is Spotless ;-) 
Take care for now!
If you enjoyed this post and don't want to miss out ;-) click up top there on the right and follow along!
For information on my on-line design services, please click here.
For on-site design services {Greater Hampton Roads and Richmond Virginia}, please email seasideinteriors01@gmail.com for pricing and availability.
Seaside Interiors


January 24, 2013

Minecraft Party Design Board!


A few weeks ago we did a Lego Friends birthday party for my daughter and now we are back at it again.  This time for my son's birthday. 

Ethan loves his Minecraft.  No, sorry, he LOVES!!!! his Minecraft.     Minecraft is a computer building game where you build all sorts of structures and you have to watch out for the Creepers (Mean men with bad mustaches).  My son would say it is so much more than that!  Whatever it is, the creators of it where really smart because the only music I hear coming from the computer is beautiful  piano music.  So it makes me think he's absorbing classical music, when in actuality, he's really blowing up blocks and takin out bad guys.  Smart I tell you, very smart!

 Yesterday I posted about his Minecraft Invitations that I made for his party.


After I finished those, I decided to put together a fun Party Design Board to help narrow everything down and give me a visual of what is needed to be done.  When I have a list in hand or in this case a picture, I am way less stressed to complete a project. 

Here is the Design Board I created for Ethan's party...

Sources


  In the game, they use the black coal to make things with, so why not eat it in rice krispy form? 


This might just be the easiest cake I have ever made.  A block with a piece of white fondant on top and some red squares.  Thank you Minecraft ;-)   I am not going to be able to use the edible images for the cookies since, as usual, I am on a strict budget.  Aren't we all?  Just say yes, even if you're not.  It will make me feel good, lol. 


 Instead of an edible image, I am just going to freehand some of the designs.

 Wish me luck and let's hope it doesn't turn out like this...


For the glass windows on Minecraft, they all have the white pattern you see on the Design Board, so hello roll of white tape.  Why I am most excited about taping this pattern to my sliding glass door I will never know.  I can tell you I won't be when it comes time to take it all off and clean the door, but I don't think about that stuff when I come up with my schemes ;-)


All though the Goody Bags from Etsy are adorable, again with the Budget, I will be making them.  Some cheap green paper bags and some black insulation tape should give me a similar look. 

I hope you enjoyed my little board for the Party, take care for now!

If you enjoyed this post and don't want to miss any of these amazing posts ;-)  click up top there on the right and follow along!
For information on my on-line design services, please click here.
For on-site design services {Greater Hampton Roads and Richmond Virginia}, please email seasideinteriors01@gmail.com for pricing and availability.
Seaside Interiors


January 23, 2013

Cupcakes and Minecraft Invites!

UPDATE:  Minecraft Party Printables are now available through Paypal on the right hand column of the blog! 

Today the only decorating I'm doing consists of cakes and party invitations.  Since today is my son's 11th birthday.


It seems to be getting harder and harder for me every year on their birthdays.  And next year he heads off to middle school.  I don't know what I'm gonna do when they turn 16 or graduate and leave home.  Well, he and my daughter confessed that they will be staying with us forever.  Ummmm....  I said it is getting harder and harder to let go, I didn't say impossible ;-)   We will need a little break away at some point, lol.
But none the less, he keeps getting older and I keep getting younger.  I know, it's so weird how that works.  I just go with it.
He will be having a birthday party sleep over in a couple weeks that I am starting to prepare for, but today, I just wanted to do something a little low key.  When I asked him what he wanted for dinner tonight, he replied "a full rack of ribs and creamed corn."  LOL.  He's quirky like that.
Last night while we were heading to the store, he said, "make sure you get everything to make my cupcakes for my class tomorrow and make them the best flavored ones you ever have.  So that when my friends in class eat them, they will love them and want to come to my party." 
Really, it is like he's running for office or something!
So I threw together some vanilla and chocolate cupcakes (box mix, SHHH!) with some chocolate chip butter cream and ran them over to school this morning.
 I put the butter cream together using the wilton recipe and just added in the chocolate chips.  I 6 x'd the batch so the measurements were:
Wilton Buttercream Large Batch
3 (2 Ib.) bags of powdered sugar
2 tbsp. vanilla extract
1/4 - 1/2 C. Milk (Less for stiffer icing; more if you want a soft batch)
6 C. Crisco or (3 C. Crisco and 3 C. Butter)
1 Large Bag of chocolate chips  (Chop them up and throw them in to the butter cream when it is mixed, but save some to add to the top when you are all done.
* Note:  I always cover my mixer when making this with a wet kitchen towel to help with the mess. 
I put them in my handy dandy cupcake carrier and took them over to the class. 
The other thing I had to do today was make my son's invites and send them out for his party.  He is having a Minecraft themed party.  He is Minecraft crazy!  For those of you who don't have a son, Minecraft is a computer game where you build and create worlds and have these weird faced bad guys called Creepers attack you.  Well, at least that's how I see it.
So I tried my hand at making the invites after I saw one that I really liked on Etsy.  I went into Photoshop Elements to create it.  I pulled pictures from Google and layered them on top of each other to create an almost identical one to the inspirational picture I found. 
 I printed them out as a set of three per sheet and cut them out individually.
I love that they are like concert tickets!
I actually found the Minecraft font online too and embedded it into my Photoshop fonts.  Oh how I love fonts :-)
Even though I printed them out on card stock, I wanted a really heavy duty weight to them, so I put some glue on the back of the invite and adhered it to a second piece of card stock.  Then I cut them out one more time.
See it is a really thick invitation now and looks more professionally printed.
All finished and ready to send.  
 As you may be able to tell by all the arrows and words on my photos, I have been playing around on www.picmonkey.com.  It's a free website that allows you to "pretty up"  your pictures.  You can also upgrade for around $33 for the year, which is what I did, so that you can put all sorts of titles and arrows and whatever else you would like to on your photos to finish them off. 
If you enjoyed this post then click up top there on the right and follow along :)
For information on my on-line design services, please click here.
For on-site design services {Greater Hampton Roads and Richmond Virginia}, please email seasideinteriors01@gmail.com for pricing and availability.
Seaside Interiors